# Migrating from Plugin Node V2 to V2.4 Without Changing the Node Address
This guide outlines the process of upgrading Plugin Node from version 2.0 to 2.4 while transitioning from Ubuntu 20.04 to 24.04, all while preserving the existing node address. A hard reset and fresh installation normally result in a new node address. However, maintaining the current address provides key advantages:
* No need to withdraw or transfer funds
* Seamless access to deposited XDC and PLI
* Easier adoption of Plugin 2.4’s new features
Upgrading to Ubuntu 24.04 is essential for long-term security and support. By following this approach, node operators can streamline the upgrade process while minimizing operational disruptions.
# 1 - Backup on Plugin Node V2.0
In Plugin Node 2.0, the following four steps are carried out:
* 1.1 Generate and Export Node Address Keystore File
* 1.2 Configure Backup Directory and Set Permissions for Plugin Node V2.0
* 1.3 Save Essential Files in the Backup Directory
* 1.4 Transfer Backup Locally Using SFTP or Other Methods
**1.1 Generate and Export Node Address Keystore File**
The command outputs the node address keystore file to the home directory.
```
cd ~/pluginV2Install/
```
```
./pli_node_scripts.sh keys
```
**1.2 Configure Backup Directory and Set Permissions for Plugin Node V2.0**
Now, let's execute the setup script to verify that the backup directory and permissions are correctly configured.
```
./_plinode_setup_bkup.sh
```
**1.3 Save Essential Files in the Backup Directory**
Before upgrading to Plugin Node 2.4, it is advisable to complete a full backup in Plugin Node 2.0 using commands (1-3-1). Additionally, create a directory named originals/pluginV2 within the /plinode\_backups/ directory and copy the necessary files from Plugin Node 2.0 using commands (1-3-2).
```
cd ~/pluginV2Install/
```
```
./_plinode_backup.sh -full
```
* Executes the \_plinode\_backup.sh -full script to create a complete backup of Plugin Node 2.0
```
mkdir -p /plinode_backups/originals/pluginV2 &&\
cd ~/pluginV2/ && cp -u ~/pluginV2/apicredentials.txt config.toml secrets.toml /plinode_backups/originals/pluginV2/ && \
cd ~ && cp -u ~/plinode_$(hostname -f).vars plinode_$(hostname -f)_keys*.json /plinode_backups/originals/pluginV2/ && \
tree -a /plinode_backups/
```
* Creates a backup directory (/plinode\_backups/originals/pluginV2).
* Copies essential configuration files (apicredentials.txt, config.toml, secrets.toml).
* Backs up node-specific files (plinode\_$(hostname -f).vars, key JSON files).
* Verifies the backup structure using the tree command.
```
cp ~/plinode_$(hostname -f).vars /plinode_backups/plinode_V2.vars
cp $(ls -t ~/plinode_$(hostname -f)_keys_* | head -n 1) /plinode_backups/plinode_V2_keys.json
grep "Keystore\s*=" ~/pluginV2/secrets.toml | sed "s/.*Keystore\s*=\s*'//;s/'$//" > /plinode_backups/.env.password
tree -a /plinode_backups/
```
* Copies the latest node variable and key files to /plinode\_backups/.
* Extracts the keystore password from secrets.toml and saves it securely.
* Displays the directory structure for verification.
**1.4 Transfer Backup Locally Using SFTP or Other Methods**
Before upgrading, ensure all necessary files are backed up from your server to your local machine. This step is crucial for restoring Plugin Node settings after migrating to Ubuntu 24.04.
Using an SFTP Client (Turmius Example)
A convenient way to transfer files is by using an SFTP client like Turmius, which provides an intuitive GUI for seamless file transfers between your server and local machine.
Steps to Back Up Using Turmius:
* Open Turmius and connect to your server via SFTP.
* Navigate to the /plinode\_backups/ directory on the server.
* Select the necessary backup files and download them to a local directory (e.g., C:\Users\YourName\plinode\_backups).
* Verify that all files have been successfully downloaded before proceeding with the upgrade.
The following screenshot demonstrates the backup process using Turmius:
# 2 - Installation and Configuration of Plugin Node V2.4
* 2.1 Perform a Hard Reset to Ubuntu 24.04
* 2.2 Execute Plugin Node Preparation Commands
* 2.3 Clone the Plugin V2.4 Repository and Set Permissions
* 2.4 Set Up Backup Directory and Permissions for V2.4
* 2.5 Restore Backup and Configure Plugin Node V2.4
* 2.6 Deploy Plugin Node V2.4
**2.1 Perform a Hard Reset to Ubuntu 24.04**
Reinstalling Ubuntu 24.04 on the Server
* Log in to the provider's management dashboard.
* Navigate to the "OS Reinstallation" or "Reinstall" menu.
* Select Ubuntu 24.04 and initiate the installation.
* Once the installation is complete, connect to the server via SSH and perform the necessary initial setup.
* #### ⚠ Caution
* Reinstalling the OS will erase all data on the server.
* Make sure to back up all necessary data before proceeding.
**2.2 Execute Plugin Node Preparation Commands**
Commands for Updating, Installing, Configuring, and Cleaning for Plugin Node Setup
```
sudo apt update -y && sudo apt upgrade -y && sudo apt install -y git nano ufw curl tree htop && sudo apt autoremove -y && sudo apt autoclean -y && sudo timedatectl set-timezone UTC
```
Allow permissions on below ports.
```
sudo ufw allow 6688
sudo ufw allow 6689
```
Create a new admin user account and login
```
sudo groupadd my_new_user
sudo useradd -p $(openssl passwd -6 my_new_password) my_new_user -m -s /bin/bash -g my_new_user -G sudo
sudo -i -u my_new_user
```
**2.3 Clone the Plugin V2.4 Repository and Set Permissions**
```
cd && git clone https://github.com/GoPlugin/pluginV2.4Install.git
cd ~/pluginV2.4Install
chmod +x *sh
```
**2.4 Set Up Backup Directory and Permissions for V2.4**
Now, execute the setup script to verify the backup directory and permissions are correctly configured.
```
./_plinode_setup_bkup.sh
```
**2.5 Restore Backup and Configure Plugin Node V2.4**
Backup Restoration and Cleanup Steps
* Transfer and Merge Backup Data via SFTP (2.5.1)
* Update sample.vars File (2.5.2)
* Remove V2 Node Files from the Home Directory (2.5.3)
**2.5.1 Transfer and Merge Backup Data via SFTP**
Now that Plugin Node V2.4 is set up, the next step is to restore the previously backed-up files. This ensures that the node retains its original configurations and credentials.
Steps to Restore Backup Data (Using Turmius)
* Open Turmius and connect to your server via SFTP.
* Navigate to the local backup directory (e.g., *C:\Users\YourName\plinode\_backups*).
* Transfer the files to the */plinode\_backups/* directory on the server.
* When prompted, select "Merge" instead of "Replace" or "Skip".
Why Choose "Merge"?
* Ensures that existing files are not overwritten or deleted, and only new or modified files are added.
* Choosing "Replace" might unintentionally overwrite critical configuration files.
* Verify that all necessary files have been successfully transferred before proceeding.
The following screenshot demonstrates the "Merge" selection process in Turmius:


**2.5.2 Update sample.vars File**
To inherit the settings from the V2 Node, read the vars file of the V2 Node and update the sample.vars file accordingly.
The following items should be carried over:
* API\_EMAIL: Dashboard login user ID
* API\_PASS: Dashboard login password
* PASS\_KEYSTORE: Keystore
* DB\_PWD\_NEW: PostgreSQL DB password
```
source /plinode_backups/plinode_V2.vars && \
sed -i "/API_EMAIL=/c\API_EMAIL=\"$API_EMAIL\"" ~/pluginV2.4Install/sample.vars && \
sed -i "/API_PASS=/c\API_PASS='$API_PASS'" ~/pluginV2.4Install/sample.vars && \
sed -i "/PASS_KEYSTORE=/c\PASS_KEYSTORE='$PASS_KEYSTORE'" ~/pluginV2.4Install/sample.vars && \
sed -i "/DB_PWD_NEW=/c\DB_PWD_NEW=\"$DB_PWD_NEW\"" ~/pluginV2.4Install/sample.vars
```
Ensure the sample.vars file is updated with data from pluginv2.0 node
```
cd ~/pluginV2.4Install
git diff sample.vars
```
**2.5.3 Remove V2 Node Files from the Home Directory**
Delete unnecessary files related to the V2 Node from the home directory.
`rm -rf ~/plinode_$(hostname -f)*`
**2.6 Deploy Plugin Node V2.4**
Mainnet:
`cd ~/pluginV2.4Install/ && ./pli_node_scripts.sh mainnet`
Apothem:
`cd ~/pluginV2.4Install/ && ./pli_node_scripts.sh apothem`
Ensure the new node address is generated

\
Important
Confirm the script is complete and follow the instructions to run the command below.
`source ~/.profile`
# 3 - Importing PluginV2 Node Address into PluginV2.4
* Import V2 Node Addresses(3.1)
* Remove Unnecessary Node Addresses from V2.4(3.2)
* Restart Plugin Node Process with PM2(3.3)
* Log into the Dashboard(3.4)
* Output Imported Node Address Keystore File(3.5)
**3.1 Import V2 Node Addresses**
Import the PluginV2 node address into PluginV2.4 using the JSON keystore file generated by command 1-3-3.
Mainnet:
```
cd ~/pluginv3.0/
plugin admin login -f ~/pluginv3.0/apicredentials.txt
plugin keys eth import /plinode_backups/plinode_V2_keys.json --evmChainID 50 --oldpassword /plinode_backups/.env.password
```
Apothem:
```
cd ~/pluginv3.0/
plugin admin login -f ~/pluginv3.0/apicredentials.txt
plugin keys eth import /plinode_backups/plinode_V2_keys.json --evmChainID 51 --oldpassword /plinode_backups/.env.password
```

\ **3.2 Removing Unnecessary Node Addresses from PluginV2.4**
Let's start by displaying a list of node addresses, and then we'll proceed to delete the new node address created during the unnecessary V3 setup.
`plugin keys eth list`

Next, let's delete the new node address created during the PluginV2.4 setup
`plugin keys eth delete TARGET_FOR_DELETEION_ADDRESS`
Please enter yes in response to the prompt. It would be a good idea to run plugin keys eth list again for confirmation.

**3.3 Restart Plugin Node Process with PM2**
Restart the process and confirm that the address inherited from PluginV2 Node is displayed on the dashboard.
`pm2 restart all`
Please enter yes in response to the prompt. It would be a good idea to run plugin keys eth list again for confirmation.
**3.4 Logging into the Dashboard**
Log in to the Plugin UI using your IP address and confirm that the node address matches the one from Plugin V2.
The upgrade of the plugin node is now complete.
**3.5 Output Imported Node Address Keystore File**
```
rm -f ~/plinode_$(hostname -f)_keys* && \
cd ~/pluginV2.4Install/ && ./pli_node_scripts.sh keys
```
Once you have confirmed the successful import of the PluginV2 node address into the dashboard, it is recommended to perform a backup.
# 4. Backup After Plugin V2.4 Upgrade
* Full Backup (4.1)
* Organize Backup Files for Plugin Node V2.4 (4.2)
* Transferring the Backup Directory to Your Local PC (4.3)
**4.1 Full Backup**
Run the following commands to perform a FULL backup. As per the usage above this backups up both the conf files & the db.
`cd ~/pluginV2.4Install/ && ./_plinode_backup.sh -full`

**4.2 Organize Backup Files for Plugin Node V2.4**
After a successful upgrade to Plugin Node 2.4, create a directory named originals/pluginV2.4 within the /plinode\_backups/ directory and copy the relevant files from that moment into it.
```
mkdir -p /plinode_backups/originals/pluginV2.4 && \
cd ~/pluginv3.0/ && cp -u ~/pluginv3.0/apicredentials.txt config.toml secrets.toml /plinode_backups/originals/pluginV2.4/ && \
cd ~ && cp -u ~/plinode_$(hostname -f).vars plinode_$(hostname -f)_keys*.json /plinode_backups/originals/pluginV2.4/ && \
tree -a /plinode_backups/
```
**4.3 Transferring the Backup Directory to Your Local PC**
To complete the upgrade, transfer the /plinode\_backups/ directory from your server to your local PC. This ensures that all important data is safely stored.
Using an SFTP Client (Turmius Example)
* Open Turmius and connect to your server via SFTP.
* Navigate to the /plinode\_backups/ directory on the server.
* Download the entire directory to your PC (e.g., C:\Users\YourName\plinode\_backups).
* If prompted, select "Merge" to avoid overwriting existing files.
The following screenshot shows how to download the backup directory using Turmius:

\
And the node is successfully migrated into Plugin V2.4
# Steps to Set up Active Jobs on the Plugin Feeds
Note:- Node Uptime is of utmost importance when you have a live job.
🔗 GitHub Repository:[ https://github.com/GoPlugin/datafeed\_jobs](https://github.com/GoPlugin/datafeed_jobs)
This GitHub repository contains pre-defined job templates for various data feed pairs (e.g., PLI/USDT, ETH/USDT, BTC/USDT).\
Each folder includes job definitions using different price data sources such as **CoinMarketCap**, **Bitrue**, **CryptoCompare**, and **BitMart**.\
These definitions are designed to be directly used in the Plugin node, making it easier to set up and run live data feeds for your chosen crypto pair.
1. Login in to your Plugin Node user interface.
2. Set up a new job, with the definition given in the GitHub repository, specific to your job pair
1. Navigate to the “**Jobs**” section.
2. Click on the ‘**New Job**’ button to add a job definition for each price pair.
3. As mentioned above, in the Github repository, each folder contains job definitions with different sources. Copy the definition that includes the required source(s).
4. Paste the job definition and click on the ‘Create New Job’ button.
📌Note1: The data within each folder remains the same only the source changes.
📌Note2: Create your own API key if required by the data source.
3. Once done, submit the following data to the moderators:
1. Node address
2. Wallet Address
3. IP Address
4. Price Pair supported by the plugin node (i.e., the price pair job added to your node).
📌Note: The above information of the node will be submitted to the Plugin Team for the review and final approval for onboarding.
4. After the Plugin Team completes the setup:
1. The price pair job will begin running on your node.
2. As the node operator, you must verify the successful job execution.
3. Go to the Run section on your Plugin Node UI.
4. Take a screenshot showing the successful run and share it with the moderators.
Important Note:
* The node operators must maintain the minimum balance of 5 XDC.
* Keep a track of the node logs and the working of the Job thoroughly, both on the node as well as the feeds platform.
# Introduction
Plugin is a Decentralized Network built on the XDC .
### Resources
Telegram:
YouTube:
Twitter:
LinkedIn:
Discord:
**Important Note For Node Operators**
1\) Node operators are required to independently set up and maintain their nodes, possessing the essential debugging skills to ensure 24/7 functionality. This practice contributes to the stability and health of our Decentralized Network in the long run. Kindly review our setup documentation and follow the provided instructions."
2\) It is crucial for node operators to safeguard their 'wallet address' (Seed Phrase). In the event of loss, 'The Plugin Team' cannot provide support, as the responsibility for securing and protecting wallet seed phrases lies with each individual node operator. It's important to highlight that we are in decentralized environment, where each wallet seed phrase is unique to the individual.
# Unstake PLI Tokens from Plugin 1.0 Node
## STEPS TO UNSTAKE PLI FROM PLUGIN 1.0 NODES
1. Unstake your Plugin 1.0 Node.
* Members who have completed one year of staking and haven’t activated restaking can find a **button to request the unstaking of the node in the Oracles platform**.
* The other option for members who have enabled restaking would need to raise a Ticket to unstake your Plugin1.0 Node.\
While raising the ticket, in “Issue Description:” please provide the below-mentioned details.\
**a) IP address: \**\
**b) Stake ID: \**\
**c) Node Address:\**\
**d) Restake ID:\**
The IP address of your node can be found in your[ https://oracles.goplugin.co](https://oracles.goplugin.co) dashboard as mentioned in the image below.

Your node's stake ID and node Address can be found in your[ https://oracles.goplugin.co](https://oracles.goplugin.co) dashboard as mentioned in the image below.
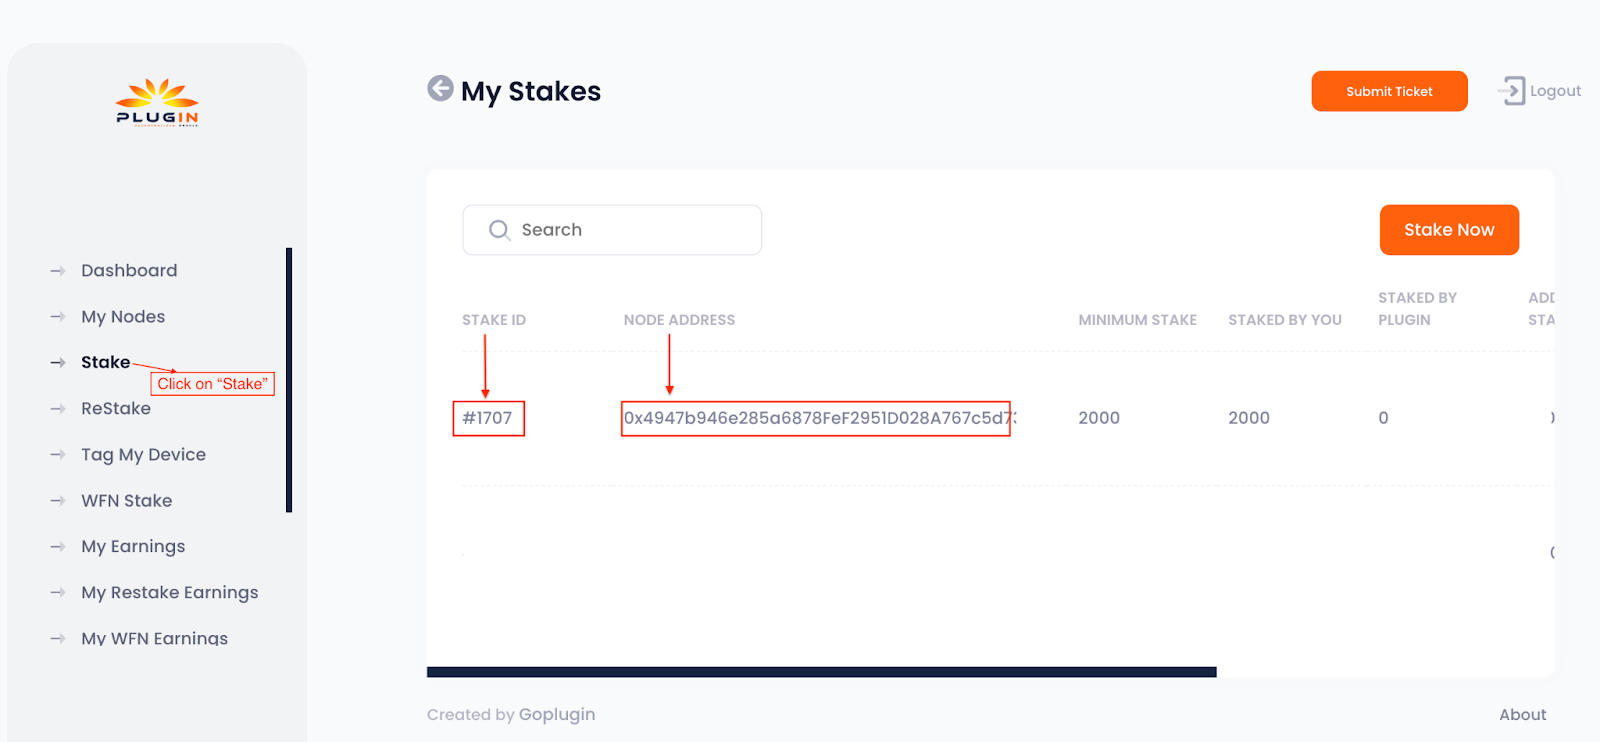
Your node's ReStake ID and node Address can be found in your[ https://oracles.goplugin.co](https://oracles.goplugin.co) dashboard as mentioned in the image below. \
**Note :-** Cumulative tokens must reach 500 to get paid and this will get auto-calculated when the node is in the staking pool. Once the node is in un-staked status, the cumulative tokens will not be incurred further.
NOTE: In Plugin2.0 we do not support the Docker Method of node installation, we do support only script-based node installation. To refresh the Docker-based Plugin1.0 node to Plugin2.0, refreshing the node with your VPS service provider is the better option.
2. Once the node is unstaked, withdraw the PLIs to your registered wallet account.
3. Now you can reset your node with the help of your VPS provider or else you can use the script ‘reset\_pli.sh’ which will be found in your “plugin\_deployment” directory (If you installed Plugin1.0 using “Modular Method”).
4. If you are selecting the 'reset\_pli.sh' option to refresh your node, then remove the following lines from your "\~/.profile".\
\
export GOROOT=...............\
export GOPATH=................\
export FEATURE\_EXTERNAL\_INITIATORS=true\
\
And for "export PATH" entry, remove "$GOROOT/bin", "$GOPATH/bin" alone from PATH variable. Now run "source \~/.profile" in the cli of your node.
# Plugin 2.0 Set Up Requirements
● RAM 4GB - 8GB Minimum\
● Storage - 50GB - 100 GB
● Ubuntu OS 20.04
● Contabo / Other Cloud which guarantees 99.99% uptime.\
NOTE: The node operates on 4GB RAM, but it will become unstable soon. So, we encourage operators to use 8GB RAM. Likewise, the minimum storage is 50GB, we encourage to allocate 100GB of storage.
Cloud hosting is better to provide high availability and good reputation
# Node Installation
Plugin 2.0 :- STEPS TO SETUP PLUGIN 2.0 NODE ON LINUX VPS
1. Login as root to your new VPS
2. Update the system and add base packages before executing the below command on the root terminal.
* sudo apt update -y && sudo apt upgrade -y && sudo apt install -y git nano curl && sudo apt autoremove -y
3. Allow permissions on the below ports.
1. sudo ufw allow 6688
2. sudo ufw allow 6689
4. Create a new admin user account
1. sudo groupadd my\_new\_user
2. sudo useradd -p $(openssl passwd -6 my\_new\_password) my\_new\_user -m -s /bin/bash -g my\_new\_user -G sudo
5. Now open a new terminal session to your VPS and logon with your new admin user account and complete the rest of the steps.
1. sudo -i -u my\_new\_user
6. git clone ;
7. cd [pluginV2Install](https://github.com/GoPlugin/pluginV2Install.git)
8. chmod +x \*.sh
9. ./pli\_node\_scripts.sh mainnet
```
[Usage: ./pli_node_scripts.sh {function}]
Example: ./pli_node_scripts.sh mainnet where {function} is one of the following;
mainnet == deploys the full Mainnet node & exports the node keys
keys == extracts the node keys from DB and exports to json file for import to MetaMask
logrotate == implements the logrotate conf file
address == displays the local nodes address (after full node deploy) - required for the 'Fulfillment Request' remix step
node-gui == displays the local nodes full GUI URL to copy and paste to browser
```
10. Run the following commands
1. source \~/.profile
2. pm2 status
3. pm2 log \[id]
11. Login to the node UI with the credentials from pluginV2/apicredentials.txt
12. Go to the keys section and fetch the node address & fund it with 1 XDC and 1 PLI.
# Node Fulfillment
How to fund your node
* Login into your Plugin GUI by https\://\:6689
* Go to Key Mangaement section
* Grab "address" from "Address" as highlighted in the image below.
* Go to XDCPay or MetaMask where you have XDC / PLI and transfer some funds.
{% hint style="info" %}
**It is not necessary to dump all the funds here. 10 XDC & 5PLI should be fine to start with.**
**Also, this is not staking!.. It is just to allow your plugin node to process the transaction if any, comes your way.**
**Be cautious to fund your Node address only with the required Tokens for testing (1 to 5PLI max) DO NOT FUND MORE THAN THIS!**
**The user or the Plugin Team will not be able to withdraw any tokens that have been purposefully or mistakenly transferred to a Node address.**
{% endhint %}
After transferring the funds, you should be able to see it in the PLUGIN GUI like this
# Job Setup
Let’s create a JOB, so you can test and see if your oracle is interacting with the external world.
We have the following Jobs that need to be set up.
Direct Request Job
# Steps to Setup Direct Request Job
**ORACLE CONTRACT:**
```
// SPDX-License-Identifier: MIT
pragma solidity ^0.7.6;
import "@goplugin/contracts2_3/src/v0.7/Operator.sol";
```
While deploying this contract, need to give the “PLI” as “0xFf7412Ea7C8445C46a8254dFB557Ac1E48094391” for Mainnet and for “Owner”, the wallet address from which you are going to deploy.

Once the contract is deployed, note down the **Oracle contract address**.\
\
**Node Fulfillment:**
In the deployed Oracle click on the ‘setAuthorizedSenders’ button and pass on the node address in array format e.g(\["\"], replace ‘xdc’ to ‘0x’ in the node address) and click on the ‘transact’.
**JOB SUBMISSION:**
1. In the Jobs Section, click on the “New Job” button.\

2. Now, submit the below Job Spec and press the “Create job” button.
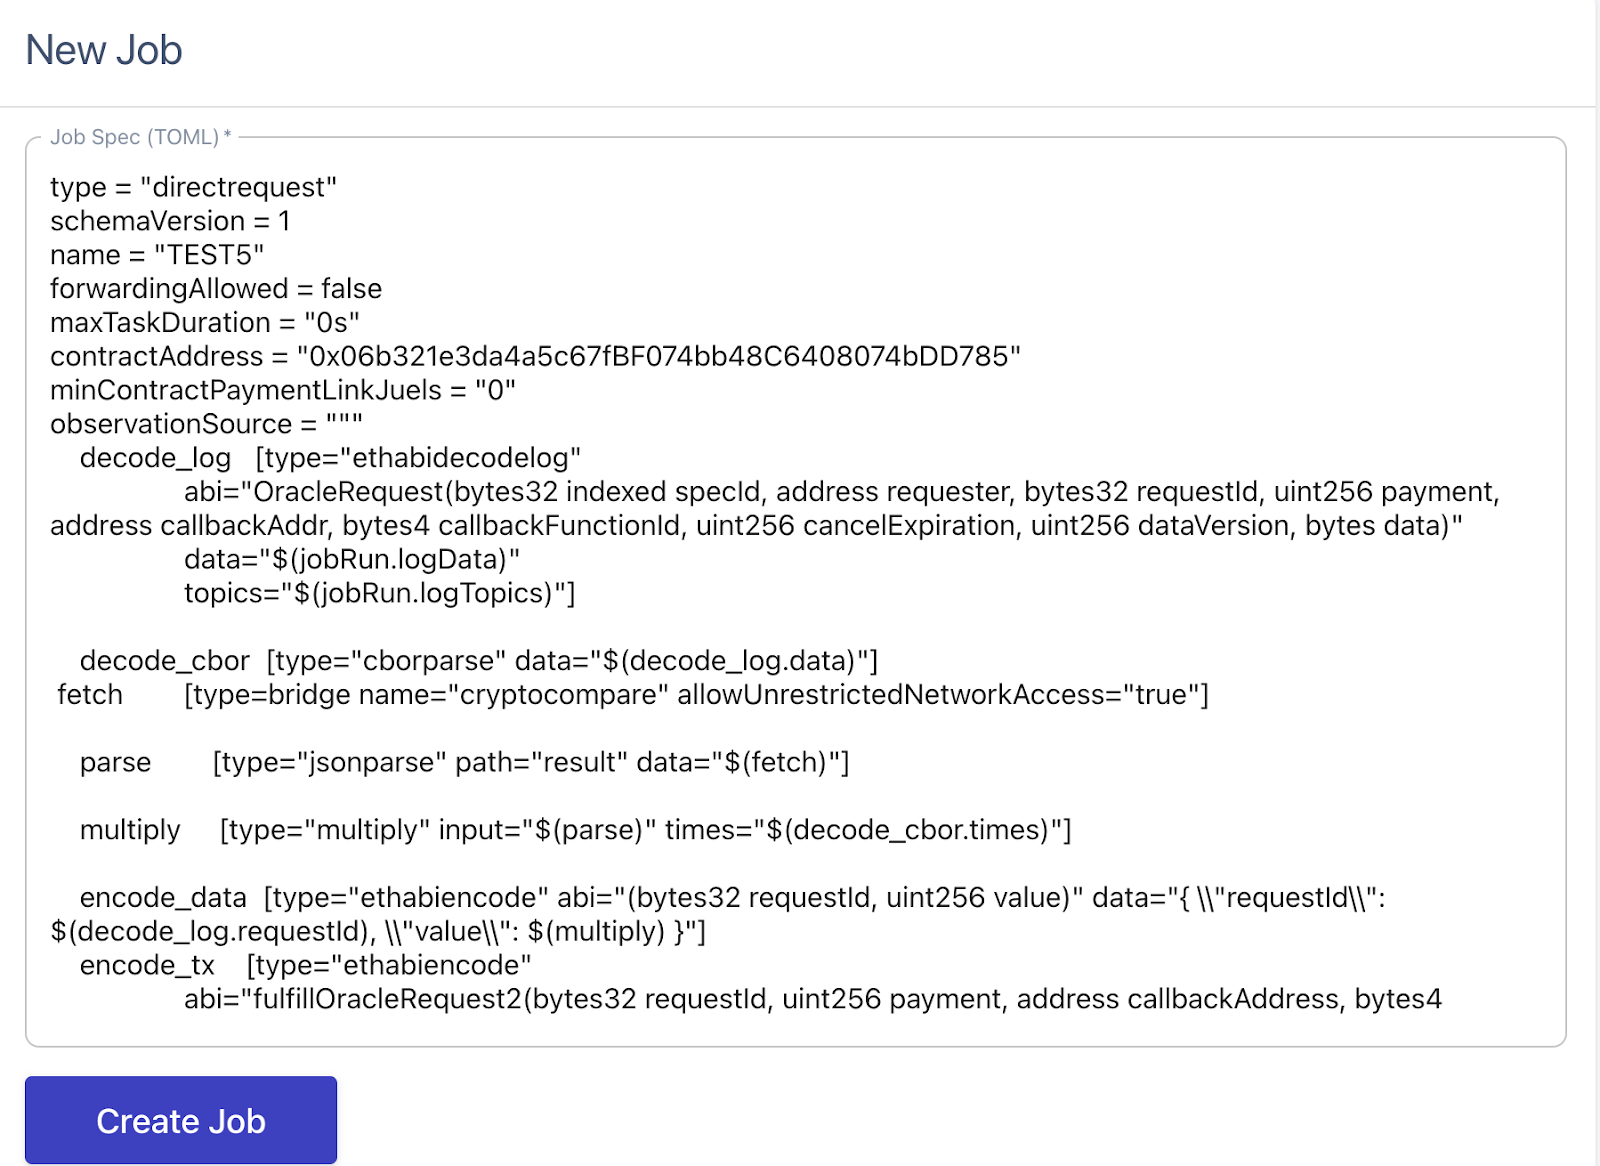\
\
**Job Spec:**
\
3\. Once the Job has been submitted successfully, copy the External Job ID and remove the hyphen(‘-’) from the job ID\
\
\
\
\
CONSUMER CONTRACT
```
// SPDX-License-Identifier: MIT
pragma solidity ^0.8.7;
import "@goplugin/contracts2_3/src/v0.8/PluginClient.sol";
import "@goplugin/contracts2_3/src/v0.8/ConfirmedOwner.sol";
/**
* THIS IS AN EXAMPLE CONTRACT WHICH USES HARDCODED VALUES FOR CLARITY.
* THIS EXAMPLE USES UN-AUDITED CODE.
* DO NOT USE THIS CODE IN PRODUCTION.
*/
contract APIConsumer is PluginClient, ConfirmedOwner {
using Plugin for Plugin.Request;
uint256 public volume;
bytes32 private jobId;
uint256 private fee;
event RequestVolume(bytes32 indexed requestId, uint256 volume);
/**
* @notice Initialize the pli token and target oracle
*
* Details:
* A. Pli Token for Mainnt: 0xff7412ea7c8445c46a8254dfb557ac1e48094391
* B. Oracle: [Copy paste the Oracle Contract Address, which you deployed as first step in this page] (Plugin DevRel)
* C. jobId:
*
*/
constructor() ConfirmedOwner(msg.sender) {
setPluginToken(0xff7412ea7c8445c46a8254dfb557ac1e48094391);//Pli address as mentioned in ‘A’
setPluginOracle();//Oracle address
jobId = "";//Job ID as stored in ‘C’ JOB SUBMISSION
fee = (0.001 * 1000000000000000000) / 10;
}
/**
* Create a Plugin request to retrieve API response, find the target
* data, then multiply by 1000000000000000000 (to remove decimal places from data).
*/
function requestVolumeData() public returns (bytes32 requestId) {
Plugin.Request memory req = buildPluginRequest(
jobId,
address(this),
this.fulfill.selector
);
// Set the URL to perform the GET request on
// req.add(
// "get",
// "/data/pricemultifull?fsyms=ETH&tsyms=USD"
// );
req.add(
"get",
"/data/price?fsym=XDC&tsyms=USDT"
);
// Multiply the result by 1000000000000000000 to remove decimals
int256 timesAmount = 10 ** 18;
req.addInt("times", timesAmount);
// Sends the request
return sendPluginRequest(req, fee);
}
/**
* Receive the response in the form of uint256
*/
function fulfill(
bytes32 _requestId,
uint256 _volume
) public recordPluginFulfillment(_requestId) {
emit RequestVolume(_requestId, _volume);
volume = _volume;
}
/**
* Allow withdraw of Link tokens from the contract
*/
function withdrawPli() public onlyOwner {
PliTokenInterface pli = PliTokenInterface(PluginTokenAddress());
require(
pli.transfer(msg.sender, pli.balanceOf(address(this))),
"Unable to transfer"
);
}
}
```
Once the contract is deployed, fund the contract with 0.1 PLI and click on ‘requestVolumeData’ & wait for few minutes and then click on ‘volume’ to get the XDC-USDT value.
\
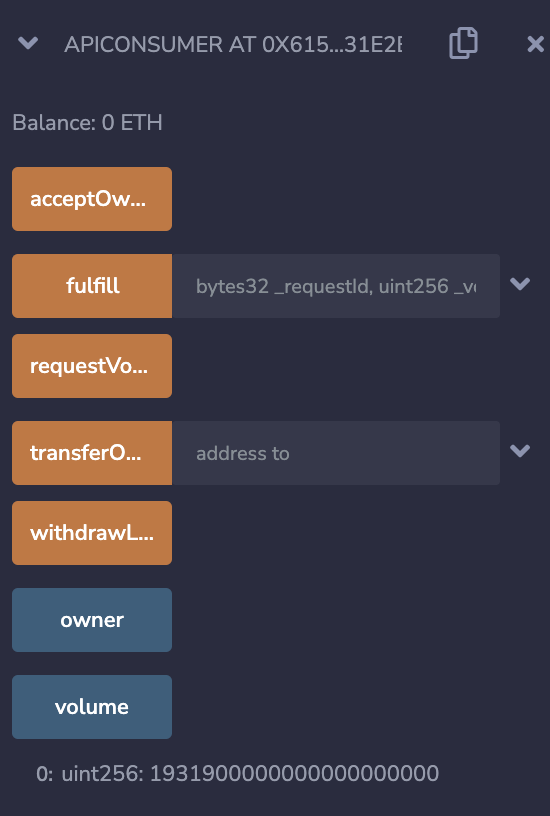\
[^1]: address received as a result of operator.sol deployment
# Process of Approval
The process of approval is simple and short:-
* Please use the link in your Dashboard to submit the new node details after reviewing and acknowledging the clauses that appear before the submit button. Only proceed with submitting the node details if you agree to all the clauses. To view the clauses, scroll to the bottom of this page.
* Node Submission Reference:
* **Send us an email() with the screenshot of your testing as given under the “CONSUMER CONTRACT” section on the “Steps to Setup Direct Request Job” page**.
\
**Mail Subject:** Approval request for \\
**Mail Content:**
\
**Node Address:** \\
**IP Address:** \\
**Attachment 1:** 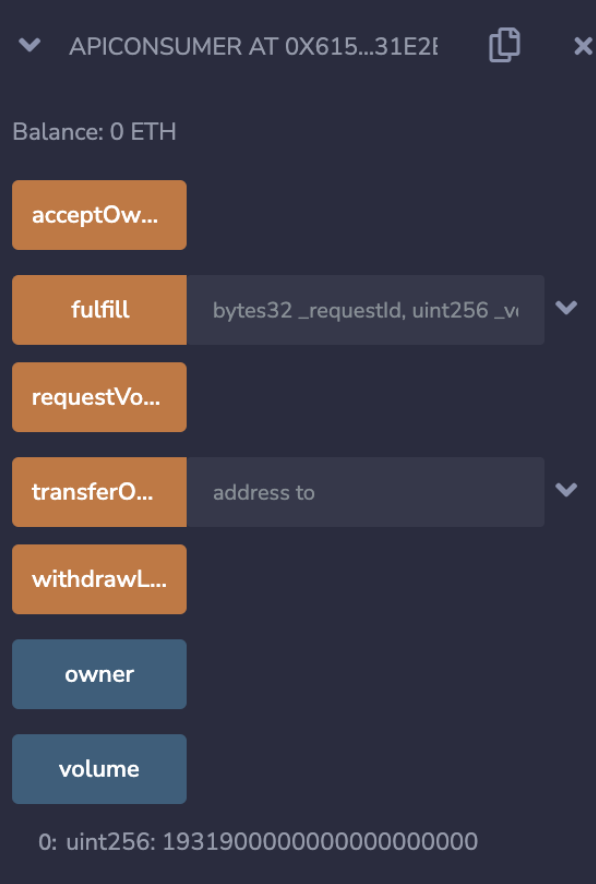
**Attachment 2: The screenshot wherein the Job is run successfully.**
**Before Submission, Please Review and Acknowledge the Following:**
1. I confirm that I am above 18 years of age and possess the required technical knowledge in Linux, Cloud server handling, solidity Smart contract, and basics of Database.
2. I commit to ensuring that my nodes will be running 24/7 and will independently handle any technical issues to ensure continuous availability.
3. I acknowledge that Plugin's Governance Committee has the authority to alter the rewarding mechanism, and I will comply with any decisions regarding the reputation and rewarding logic made by Plugin's governance committee.
4. I acknowledge that I am not a resident/citizen of a country sanctioned by the UN.
5. By checking the boxes above, I acknowledge and agree to the terms and conditions outlined in the disclaimer.
# How to Update Your Plugin Node for the Latest XDC Gas Fee
{% hint style="info" %}
Note:- XDC's recent upgrade to version 2.0 impacts the gas fees required per transaction in its network, making it necessary to update Plugin nodes to reflect the new fees. The steps for this upgrade are outlined below.
This documentation guides plugin node operators in updating their node configurations to avoid transactions being stuck in a pending state due to insufficient gas fees. It is recommended to modify the config.toml file by setting the minimum gas price to 12.5 gwei, as the default value of 1 gwei may result in job failures. By implementing this change, node operators can ensure smooth transaction processing and prevent operational disruptions.
{% endhint %}
Follow these steps to update the Plugin node on your server to reflect the latest gas fee:
Step 1: Login to the Server
* Open your terminal and log in to the server hosting the Plugin node:
* ssh \[your-username]@\[server-ip-address]
Step 2: Navigate to the Configuration File
* Navigate to the directory containing the configuration file:
* cd /path/to/pluginV2/
Step 3: Edit the config.toml File
* Open the config.toml file using your preferred text editor (e.g., nano or vim):
* nano config.toml
Step 4: Modify the File
* In the config.toml file, add the following section under the existing content
* \[EVM.GasEstimator]
* PriceMin = '12.5 gwei'
Step 5: Save the Changes in the file
* For nano, press CTRL + X, then Y to confirm, and Enter to save.
* For vim, press Esc, type :wq, and press Enter.
Step 6: Restart the Plugin Node
* Restart the Plugin node to apply the changes:
* pm2 restart \[process ID] (Replace \[process ID] with the actual process ID of the Plugin node.)
Step 7: Verify the Changes
* Ensure the node is running properly by checking the status and node logs:
* pm2 status
* pm2 log \[process ID]
Reach out to the Team/Moderators on Plugin's Discord Server in case of any issues here.
Discord invite link :-
# Introduction
## Introduction
Decentralized Network Platform provides cost-effective solutions to any smart contract that runs on the XDC Eco System.
Plugin enables the smart contract to connect with the real-time world and the data that it receives from the data feed provider is trustable by maintaining a high degree of security. Off-chain computation it does takes care of receiving a feed from multiple providers and aggregates the same.
### Resources
Telegram:
YouTube:
Twitter:
LinkedIn:
Facebook:
Medium:
Reddit:
Discord:
## Is Plugin Open sourced?
Yes, Plugin is completely open sourced and all the code repositories that are available in our Git are open to use and modify
# Set-up Requirements
Validator Nodes Infra Requirement
● RAM 16GB to 32GB
● Storage - 400 - 500 GB
● Ubuntu OS 20.04
● Contabo / Other Cloud which guarantees 99.99% uptime.
Cloud hosting is better to provide high availability and good reputation
# Job Setup
**Let’s create a JOB, so you can test and see if your oracle is interacting with the external world.**
**We have the following Jobs that need to be setup.**
1. **Direct Request Job**
2. **Flux Monitor Job**
1. **Idle Timer**
2. **Drum Beat**
3. **Poll Timer**
4. **Poll Timer + Idle Timer (Recommended Approach)**
# Steps to Setup Direct Request Job
**ORACLE CONTRACT:**
```
// SPDX-License-Identifier: MIT
pragma solidity ^0.7.6;
import "@goplugin/contracts2_3/src/v0.7/Operator.sol";
```
While deploying this contract, need to give the “PLI” as “0xFf7412Ea7C8445C46a8254dFB557Ac1E48094391” for Mainnet and for “Owner” , the wallet address from which you are going to deploy.

Once the contract is deployed, note down the **oracle contract address**.\
\
**Node Fulfillment:**
In the deployed Oracle click on ‘setAuthorizedSenders’ button and pass on the node address in array format e.g(\[‘\’], replace ‘xdc’ to ‘0x’ in the node address) and click on the ‘transact’.
**JOB SUBMISSION:**
1. In the Jobs Section, click on the “New Job” button.\

2. Now, submit the below Job Spec and press the “Create job” button.
\
\
**Job Spec:**
\
3\. Once the Job has been submitted successfully, copy the External Job ID and remove the hyphen(‘-’) from the job ID\
\
\
\
\
CONSUMER CONTRACT
```
// SPDX-License-Identifier: MIT
pragma solidity ^0.8.7;
import "@goplugin/contracts2_3/src/v0.8/PluginClient.sol";
import "@goplugin/contracts2_3/src/v0.8/ConfirmedOwner.sol";
/**
* THIS IS AN EXAMPLE CONTRACT WHICH USES HARDCODED VALUES FOR CLARITY.
* THIS EXAMPLE USES UN-AUDITED CODE.
* DO NOT USE THIS CODE IN PRODUCTION.
*/
contract APIConsumer is PluginClient, ConfirmedOwner {
using Plugin for Plugin.Request;
uint256 public volume;
bytes32 private jobId;
uint256 private fee;
event RequestVolume(bytes32 indexed requestId, uint256 volume);
/**
* @notice Initialize the pli token and target oracle
*
* Details:
* A. Pli Token for Apothem: 0x33f4212b027E22aF7e6BA21Fc572843C0D701CD1
* B. Oracle: 0x6090149792dAAeE9D1D568c9f9a6F6B46AA29eFD (Plugin DevRel)
* C. jobId: ca98366cc7314957b8c012c72f05aeeb
*
*/
constructor() ConfirmedOwner(msg.sender) {
setPluginToken(0x33f4212b027E22aF7e6BA21Fc572843C0D701CD1);//Pli address as mentioned in ‘A’
setPluginOracle(0x06b321e3da4a5c67fBF074bb48C6408074bDD785);//Oracle address
jobId = "53034a3f099949f787937a96fa3e9a32";//Job ID as stored in ‘C’ JOB SUBMISSION
fee = (0.001 * 1000000000000000000) / 10;
}
/**
* Create a Plugin request to retrieve API response, find the target
* data, then multiply by 1000000000000000000 (to remove decimal places from data).
*/
function requestVolumeData() public returns (bytes32 requestId) {
Plugin.Request memory req = buildPluginRequest(
jobId,
address(this),
this.fulfill.selector
);
// Set the URL to perform the GET request on
// req.add(
// "get",
// "/data/pricemultifull?fsyms=ETH&tsyms=USD"
// );
req.add(
"get",
"/data/price?fsym=XDC&tsyms=USDT"
);
// Multiply the result by 1000000000000000000 to remove decimals
int256 timesAmount = 10 ** 18;
req.addInt("times", timesAmount);
// Sends the request
return sendPluginRequest(req, fee);
}
/**
* Receive the response in the form of uint256
*/
function fulfill(
bytes32 _requestId,
uint256 _volume
) public recordPluginFulfillment(_requestId) {
emit RequestVolume(_requestId, _volume);
volume = _volume;
}
/**
* Allow withdraw of Link tokens from the contract
*/
function withdrawPli() public onlyOwner {
PliTokenInterface pli = PliTokenInterface(PluginTokenAddress());
require(
pli.transfer(msg.sender, pli.balanceOf(address(this))),
"Unable to transfer"
);
}
}
```
Once the contract is deployed, fund the contract with 0.1 PLI and click on ‘requestVolumeData’ & wait for few minutes and then click on ‘volume’ to get the XDC-USDT value.
\
\
\
[^1]: address received as a result of operator.sol deployment
# Flux Monitor Job
Fields:
To create new job, login into the UI of the node and Click on Jobs > New Job, as shown below
* contractAddress:The address of the FluxAggregator contract responsible for managing the data feed.
* threshold:Represents the percentage threshold of deviation from the previous on-chain answer. This threshold must be met before a fresh set of observations is submitted to the contract.
* absoluteThreshold(optional):This parameter indicates the absolute numerical deviation necessary from the previous on-chain answer before submitting new observations. It's particularly useful when data can sometimes reach zero, making it impossible to calculate a percentage deviation from zero.
* idleTimerPeriod:Specifies the time interval (starting from the initiation of the last round) after which a new round is automatically triggered. This occurs regardless of any observed off-chain deviations.
* idleTimerDisabled:Determines whether the idle timer is utilized to trigger new rounds.
* drumbeatEnabled:Indicates whether the drumbeat mechanism is employed to initiate new rounds.
* drumbeatSchedule:Defines the cron schedule for the drumbeat. Use the same syntax as the cron job type, and remember to include CRON\_TZ.
* pollTimerPeriod:Sets the frequency at which the off-chain data source is inspected for deviation against the previously submitted on-chain answer.
* pollTimerDisabled:Specifies whether the occasional deviation check is employed to trigger new rounds
# Idle Timer
```
```
# Drum Beat
```
type = "fluxmonitor"
schemaVersion = 1
name = "XDC/USDT Flux Drum Beat"
forwardingAllowed = false
maxTaskDuration = "30s"
absoluteThreshold = 0
contractAddress = "FM contract address"
drumbeatEnabled = true
drumbeatSchedule = "CRON_TZ=UTC */30 * * * * *"
idleTimerPeriod = "30s"
idleTimerDisabled = true
pollTimerPeriod = "1m0s"
pollTimerDisabled = true
threshold = 0.5
observationSource = """
// data source 1
ds1 [type="http" method=GET url="/data/price?fsym=XDC&tsyms=USDT"]
ds1_parse [type="jsonparse" path="USDT"]
ds1_multiply [type="multiply" input="$(ds1_parse)" times=10000]
// data source 2
ds2 [type="http" method=GET url="/data/price?fsym=XDC&tsyms=USDT"]
ds2_parse [type="jsonparse" path="USDT"]
ds2_multiply [type="multiply" input="$(ds2_parse)" times=10000]
ds1 -> ds1_parse -> ds1_multiply -> medianized_answer
ds2 -> ds2_parse -> ds2_multiply -> medianized_answer
medianized_answer [type=median]
"""
```
# Poll Timer
```
type = "fluxmonitor"
schemaVersion = 1
name = "XDC/USDT Flux Poll Timer"
forwardingAllowed = false
maxTaskDuration = "30s"
absoluteThreshold = 0
contractAddress = "FM Contract address"
drumbeatEnabled = false
drumbeatSchedule = "CRON_TZ=UTC */10 * * * * *"
idleTimerPeriod = "30s"
idleTimerDisabled = true
pollTimerPeriod = "1m0s"
pollTimerDisabled = false
threshold = 0.1
observationSource = """
// data source 1
ds1 [type="http" method=GET url="/data/price?fsym=XDC&tsyms=USDT"]
ds1_parse [type="jsonparse" path="USDT"]
ds1_multiply [type="multiply" input="$(ds1_parse)" times=10000]
// data source 2
ds2 [type="http" method=GET url="/data/price?fsym=XDC&tsyms=USDT"]
ds2_parse [type="jsonparse" path="USDT"]
ds2_multiply [type="multiply" input="$(ds2_parse)" times=10000]
ds1 -> ds1_parse -> ds1_multiply -> medianized_answer
ds2 -> ds2_parse -> ds2_multiply -> medianized_answer
medianized_answer [type=median]
"""
```
# POLL TIMER + IDLE TIMER (Recommended)
```
type = "fluxmonitor"
schemaVersion = 1
name = "XDC/USDT Flux Poll Timer + Idle Timer"
forwardingAllowed = false
maxTaskDuration = "30s"
absoluteThreshold = 0
contractAddress = "FM Contract address"
drumbeatEnabled = false
drumbeatSchedule = "CRON_TZ=UTC */10 * * * * *"
idleTimerPeriod = "30s"
idleTimerDisabled = false
pollTimerPeriod = "1m0s"
pollTimerDisabled = false
threshold = 0.1
observationSource = """
// data source 1
ds1 [type="http" method=GET url="/data/price?fsym=XDC&tsyms=USDT"]
ds1_parse [type="jsonparse" path="USDT"]
ds1_multiply [type="multiply" input="$(ds1_parse)" times=10000]
// data source 2
ds2 [type="http" method=GET url="/data/price?fsym=XDC&tsyms=USDT"]
ds2_parse [type="jsonparse" path="USDT"]
ds2_multiply [type="multiply" input="$(ds2_parse)" times=10000]
ds1 -> ds1_parse -> ds1_multiply -> medianized_answer
ds2 -> ds2_parse -> ds2_multiply -> medianized_answer
medianized_answer [type=median]
```
# Process Of Approval
The process of approval is simple and short:-
* Please use the link in your Dashboard to submit the new node details after reviewing the details.
* **Send us an email() with the screenshot of your testing as given under the “CONSUMER CONTRACT” section on the “Steps to Setup Direct Request Job” page**.
**Mail Subject:** Approval request for \ **Mail Content:**
**Node Address:** \ **IP Address:** \
**Attachment 1:** 
**Attachment 2: The screenshot wherein the Job is run successfully.**
# Rewards Information
**The monthly reward for a validator node:-**
The monthly reward for the staked PLI tokens is **2.5%.**
Validator Nodes are expected to be operational 24/7. Node operators are rewarded for the trustable data and any false data will be penalized through the ‘carrot and stick’ method.
**Effective 1st June 2026 the rewards has been updated as follows:**
The validator reward rate has been increased from 2.5% to 3.5%.
**Example (Validator serving Data Feeds with 100000 PLI staked):**
* Base Staking 50,000 -> 3.5% = 1750
* Additional staking 50,000 -> 3.5% = 1750
**Total Monthly Reward:** 3500 PLI
**How does the rewards penalty work?**
Penalties will be calculated as the total monthly reward minus (the number of inactive days multiplied by the per-day incentive).
Even one hour of downtime will be reflected in the reduction of the per-day incentive.
To further elaborate, Firstly, the number of inactive days is calculated using multiple levels of testing on the node, and then that is multiplied by the per-day incentive. After which the value is subtracted from the monthly reward calculated for that node.
**Where can I see the number of inactive days per node on the platform?**
The number of inactive days per node can be seen on the "My Incentives" Page once you log into the Oracles Dashboard.
**What happens to my rewards when I unstake my validator node, rebuild it, and restake it. ?**
During this process, if your node address changes, your rewards are calculated afresh from the date of your new node staking. And, if your node address is not changed and remains the same as the old node's address, then there is no impact on your rewards.
Important Note: If a member has a staking reward day on the 15th day of each month and if the member unstakes on the 10th day and does rebuild, restake, etc., then the reward on the 15th will not be given, instead the reward will be calculated from the 10th day onwards. So you might be missing 25 days rewards.
# OCR Set-up
**OCR configuration, currently is specific for validators involved in participating in the Oracle price feeds.** \ **We will send an announcement to validators while changing the current price feeds to OCR protocol based price feeds.**
Here are the detailed steps to enable Offchain reporting onto the Plugin Node for Peer.
1. To enable OCR in the Plugin environment, set the parameters in the `config.toml` file as shown below. Once the changes are made, restart the plugin using `pm2 restart 0`.
```
// OCR parameters in config.toml in addition to Plugin parameters
[P2P]
PeerID = ''
[P2P.V1]
Enabled = true
[P2P.V2]
Enabled = true
AnnounceAddresses = [':5001']
DefaultBootstrappers = ['@:5001']
ListenAddresses = [':5001']
[OCR]
Enabled = true
KeyBundleID = ''
[OCR2]
Enabled = true
KeyBundleID = ''
```
2. To set up the foundry repository pull the code base to your local environment git clone
3. Now move into the foundry contracts directory
* "cd foundry/contracts/v0.7.6"[ ](https://github.com/GoPlugin/foundry.git)
4. Invoke remix to deploy Offchainaggregator contract
* "remixd -s . -u "
5. Once the remix is invoked, open the remix in the browser "" URL.
6. Now select Offchainaggregator.sol contract as given below.
7. Parameters for deploying Offchainaggregator.sol
i) Constructor params: \
ii) Decimal: 18
iii) Billing Access Controller: \
iv) Request Access Controller: \
v) Min Ans : 0
vi) Max Ans : 99999999999999999999
vii) Validator : 0x0000000000000000000000000000000000000000 \
viii) PLI : 0x33f4212b027E22aF7e6BA21Fc572843C0D701CD1 \
ix) Max gas price : 3000
x) Reasonable Gas Price: 75
xi) MicroPliPerEth: 305186108
xii) PliWeiPerObservation : 151513582
xiii) PliWeiPerTransmission : 9090766
8. To get the OS instruction set of server, execute the command "uname -m" in CLI.
9. Now execute the command in foundry directory as given below.
{% code overflow="wrap" fullWidth="true" %}
```sh
external/OCRHelper/ocrhelper-linux- NODE_ADDRESSES="","","","" OFFCHAIN_PUBLIC_KEYS=",,," CONFIG_PUBLIC_KEYS=",,," ONCHAIN_SIGNING_ADDRESSES=",,," PEER_IDS=",,,"
```
{% endcode %}
```
// SAMPLE OUTPUT of the above command execution
[0x4bEDDe1B6464aC385C32E06Db3E3cD7486636BA7,0x336acE60B9247CC39996f15B2788AD7C9df7b2A1,0xeF53A8245De8169c40a2325Bab7D7369a92Fb4bC,0xae51BD92635FCbD683975aEcB778f2CE7d013FA5]
[0xe2B935C17089b31c457B80A577338AbeDD5e6206,0xF73A7CD3908700F18e424C327c0301583bcEf41d,0x3CE7D10187eFf99DEbDC0923B2d4F447A5b42eB9,0x20A3beCE1147e33F1932AA12245E50858b261fFB]
1
1
00000000000000000000000000000000000000000000000000000000000000200000000000000000000000000000000000000000000000000000000826299e0000000000000000000000000000000000000000000000000000000003f5476a0000000000000000000000000000000000000000000000000000000006fc23ac0000000000000000000000000000000000000000000000000000000002cb4178000000000000000000000000000000000000000000000000000000034630b8a00000000000000000000000000000000000000000000000000000000000000000010000000000000000000000000000000000000000000000000000000df847580000000000000000000000000000000000000000000000000000000000000000060000000000000000000000000000000000000000000000000000000000000180000000000000000000000000000000000000000000000000000000000000024000000000000000000000000000000000000000000000000000000000000002e000000000000000000000000000000000000000000000000000000000000004000000000000000000000000000000000000000000000000000000000000000005000000000000000000000000000000000000000000000000000000000000000100000000000000000000000000000000000000000000000000000000000000020000000000000000000000000000000000000000000000000000000000000002000000000000000000000000000000000000000000000000000000000000000200000000000000000000000000000000000000000000000000000000000000020000000000000000000000000000000000000000000000000000000000000004315e5b0930b10e51c9149013ed68fa88c6bc230048212ccb7066cb02f4525e282d1fb82f0b3b1fa7a32531bac38c5cb53b030711165038b1185f5259d3db678317af622227ec7bf7f4e32c5a2b4161d86147c299750b236043622a83af6901719a829bf2db49f3e215c948b8108e4da83cb61ed5c53483e237175fb57d9ec2a700000000000000000000000000000000000000000000000000000000000000e37032705f313244334b6f6f5748596e694c6b76376f7a32726a3374564c4156657231384b373546356b4e736142506277576d6a6d686158432c7032705f313244334b6f6f57506f716a36486d7a6e5738553657436e4a46486a516774486442594a3352425a4770624b46473662316461652c7032705f313244334b6f6f57536165344b624835374d446e48504b476a656739354e444d593435347273334739376e51474d6335356f396a2c7032705f313244334b6f6f57535756386a74774b363666347a435a4237597179595238734a64674b316e547743354c5347313347353472640000000000000000000000000000000000000000000000000000000000d91977e6e91d96dc1577706e4d6b4232bfdd4cdb5a26e3de7c6ba5ecade1c224bc052e956da259990fa5364def4eb76fcee1374aa863d7244db0fc39dee675870000000000000000000000000000000000000000000000000000000000000060000000000000000000000000000000000000000000000000000000000000000467df5168d0cd9e03571d5afeb312e7df00000000000000000000000000000000a278a323a7bcc33f6dcc64fe7ec960c100000000000000000000000000000000fa7aca070b44c477a2eb93f4f17f134a000000000000000000000000000000005b1e4c4b5cd02a4861b707e23ff2c6b900000000000000000000000000000000
```
10. Get the \[5th] parameter field from the above output as the value of hexString
11. Deploy the cast.sol contract in remix to convert the hexString value to solidity bytes
````
```remix-solidity
// SPDX-License-Identifier: MIT
pragma solidity ^0.8.0;
contract HexToBytesConverter {
// Function to convert hexadecimal string to bytes
function hexStringToBytes(string memory hexa) public pure returns (bytes memory) {
bytes memory b = bytes(hexa);
require(b.length % 2 == 0, "Hex string has odd length");
bytes memory result = new bytes(b.length / 2);
for (uint256 i = 0; i < bytes(hexa).length / 2; i++) {
result[i] = bytes1(_fromHexChar(uint8(bytes(hexa)[2 * i])) * 16 + _fromHexChar(uint8(bytes(hexa)[2 * i + 1])));
}
return result;
}
// Helper function to convert a hex character to its value
function _fromHexChar(uint8 c) internal pure returns (uint8) {
if (bytes1(c) >= bytes1('0') && bytes1(c) <= bytes1('9')) {
return c - uint8(bytes1('0'));
} else if (bytes1(c) >= bytes1('a') && bytes1(c) <= bytes1('f')) {
return 10 + c - uint8(bytes1('a'));
} else if (bytes1(c) >= bytes1('A') && bytes1(c) <= bytes1('F')) {
return 10 + c - uint8(bytes1('A'));
} else {
revert("Invalid hex character");
}
}
// Function to simulate the usage of envBytes
function getEnvBytes() public view returns (bytes memory) {
// In a real scenario, this would retrieve the environment variable
// Using the provided long hexadecimal string as an example
string memory hexStr = "";
return hexStringToBytes(hexStr);
}
}
```
````
12. In the 'hexStringToBytes' option pass the hexString value and click to get the solidity converted bytes.
13. Set the payee in Offchainaggregator.sol contract using the below-mentioned values, and click on transact,\
transmitters: \["\","\","\","\"] \
payees: \["\","\","\","\"]
14. Now set Offchainaggregator config using setConfig option
```
signers: [1] value from step 9 output
transmitters: [2] value from step 9 output (Node address)
threshold: [3] value from step 9 output
_encodedConfigVersion: [4] value from step 9 output
encoded: bytes value from step 12
```
15. It is time to submit Job for OCR. \
\
Job spec template for Peer nodes is available in foundry directory @ ./src/sandbox/clroot/jobs/ocr\_job.toml.\
Kindly, make the required changes in the ocr\_job.toml (mentioned in between '<>')and submit the job in your node, so that it will communicate with the bootstrapper node and participate in generating the off chain report.
```
type = "offchainreporting"
schemaVersion = 1
name = "Get > Uint256 (ocr)"
forwardingAllowed = false
maxTaskDuration = "0s"
blockchainTimeout = "20s"
contractAddress = ""
contractConfigConfirmations = 3
contractConfigTrackerPollInterval = "2m0s"
contractConfigTrackerSubscribeInterval = "5m0s"
evmChainID = "51"
isBootstrapPeer = false
keyBundleID = ""
observationTimeout = "20s"
p2pBootstrapPeers = [
"/dns4//tcp/6689/p2p/"
]
p2pv2Bootstrappers = [
"@:6689"
]
transmitterAddress = ""
observationSource = """
fetch [type="http" method=GET url="https://api.coingecko.com/api/v3/simple/price?ids=ethereum&vs_currencies=usd" allowUnrestrictedNetworkAccess="true"]
parse [type="jsonparse" path="ethereum,usd" data="$(fetch)"]
multiply [type="multiply" input="$(parse)" times=100]
fetch -> parse -> multiply
"""
```
16. Job submission output\
\
Once the job is submitted you can see the job is running in Plugin UI @ "Jobs" option.
# How to Update Your Plugin Node for the Latest XDC Gas Fee
{% hint style="info" %}
Note:- XDC's recent upgrade to version 2.0 impacts the gas fees required per transaction in its network, making it necessary to update Plugin nodes to reflect the new fees. The steps for this upgrade are outlined below.
This documentation guides plugin node operators in updating their node configurations to avoid transactions being stuck in a pending state due to insufficient gas fees. It is recommended to modify the config.toml file by setting the minimum gas price to 12.5 gwei, as the default value of 1 gwei may result in job failures. By implementing this change, node operators can ensure smooth transaction processing and prevent operational disruptions.
{% endhint %}
Follow these steps to update the Plugin node on your server to reflect the latest gas fee:
Step 1: Login to the Server
* Open your terminal and log in to the server hosting the Plugin node:
* ssh \[your-username]@\[server-ip-address]
Step 2: Navigate to the Configuration File
* Navigate to the directory containing the configuration file:
* cd /path/to/pluginV2/
Step 3: Edit the config.toml File
* Open the config.toml file using your preferred text editor (e.g., nano or vim):
* nano config.toml
Step 4: Modify the File
* In the config.toml file, add the following section under the existing content
* \[EVM.GasEstimator]
* PriceMin = '12.5 gwei'
Step 5: Save the Changes in the file
* For nano, press CTRL + X, then Y to confirm, and Enter to save.
* For vim, press Esc, type :wq, and press Enter.
Step 6: Restart the Plugin Node
* Restart the Plugin node to apply the changes:
* pm2 restart \[process ID] (Replace \[process ID] with the actual process ID of the Plugin node.)
Step 7: Verify the Changes
* Ensure the node is running properly by checking the status and node logs:
* pm2 status
* pm2 log \[process ID]
Reach out to the Team/Moderators on Plugin's Discord Server in case of any issues here.
Discord invite link :-
# XDCPay - Apothem
To get Apothem PLI & XDC tokens in your wallet. Your Apothem Network settings in XDCPay has to be configured with the below metioned parameters.
STEP 1:
Network Name: \\
New RPC URL:
Chain ID: 51\
Currency Symbol: XDC

STEP 2:
Once the network setup is done, you can create an account and click on "Add Token" button in "Tokens" tab of your account.

STEP 3:
In the resultant page, give the needed parameters to set up the account and click on "Add" button.
Token Address: xdc33f4212b027e22af7e6ba21fc572843c0d701cd1\
Token Symbol: PLI\
Decimals of Precision: 18

STEP 4:
To receive Apothem XDC tokens, go to , provide your wallet address, click on the "captcha", then click on "REQUEST 1000 XDC" to receive 1000 Apothem XDC tokens in your wallet

STEP 5:
To receive PLI apothem tokens in your wallet account, got to .\
Mention your wallet account addres, Click on "Give Me PLI" drop down and select the desired amount of PLI, click on the 'captcha' and then submit.

Now you are equipped with much needed Apothem XDC & PLI to play on apothem based contracts in Plugin.
# XDCPay - Mainnet
To get PLI & XDC tokens in your wallet. Your Network settings in XDCPay have to be configured with the below mentioned parameters.
STEP 1:
Network Name: \\
New RPC URL: \
Chain ID: 50\
Currency Symbol: XDC

STEP 2:
Once the network setup is done, you can create an account and click on the "Add Token" button in the "Tokens" tab of your account.

STEP 3:
In the resultant page, give the needed parameters to set up the account and click on "Add" button.
Token Address: xdcff7412ea7c8445c46a8254dfb557ac1e48094391\
Token Symbol: PLI\
Decimals of Precision: 18

Now you can use your configured account to receive XDC & PLI tokens.
# Introduction
In the Plugin ecosystem, VRF requests are financed through subscription accounts. These accounts serve as a centralized source of funding for your VRF requests, eliminating the need to provide funding each time your application requests randomness. By using the Subscription Manager, you can create an account and pre-pay for VRF services.
Plugin VRF subscription manager allows you to subscribe to the VRF services.
Subscription Parameters:
* Subscription ID: A distinct identification number, typically a 64-bit unsigned integer.
* Subscription accounts: Accounts that hold PLI tokens to support requests made to Plugin VRF coordinator contract.
* Subscription owner: The wallet address responsible for creating and overseeing a subscription account. Only the owner has the authority to add approved consuming contracts or withdraw funds.
* Consumers: Contracts that have been granted permission to utilize funds from the subscription account.
* Subscription balance: The quantity of PLI tokens maintained within the subscription account. Requests from consuming contracts will be supported as long as there are sufficient funds in the balance. It's essential to maintain an adequate balance to ensure the smooth operation of your applications.
* Gas price: The fluctuating cost of gas determined by network conditions.
* Callback gas: Gas used for the callback request returning requested random values.
* Verification gas: Gas used to verify randomness on-chain.
* Gas lane: The maximum gas price in wei you're willing to pay, set by keyHash in your request. These limits manage gas price spikes.
* Callback gas limit: Maximum gas allowance for the callback request, set by callbackGasLimit in your request.
# Guidance on Utilizing Random Values
This guide elucidates the process of obtaining random values utilizing a straightforward contract to solicit and obtain random values from Plugin VRF Subscription Model.
This instructional assumes familiarity with the creation and deployment of smart contracts on the Xinfin Apothem Network utilizing the subsequent tools:
* The Remix Integrated Development Environment (IDE)
* MetaMask
* Xinfin Network
To commence, create a fresh subscription on the Xinfin Apothem Network.
1. Launch MetaMask and set it to operate on the Xinfin Apothem Network. The Subscription Manager automatically detects your network based on the active MetaMask network.
2. Validate on MetaMask the presence of Apothem XDC and PLI on XDC Apothem. Testnet XDC and PLI can be acquired at the respective links: [faucet.apothem.network](https://faucet.apothem.network/) and **.**
3. Access [Subscription Manager](http://vrf.goplugin.co/).
4. Initiate the creation of a subscription by selecting 'Create Subscription' and follow the subsequent instructions. If your wallet is linked to the Subscription Manager, the Admin address for your subscription will be pre-populated and non-editable. Optionally, you may input an email address and project name, both of which are kept private. MetaMask prompts for confirmation of the on-chain creation of your subscription account.
5. Upon successful creation, proceed to add funds to your subscription following the provided instructions.
6. To ensure successful processing of your request, it is imperative to sufficiently fund your subscription with PLI to meet the minimum subscription balance requirements, serving as a buffer against gas volatility. A balance of 10 PLI suffices for this example. After transaction approval, MetaMask confirms the transfer of your PLI token to your subscription account.
7. Upon fund addition, proceed to add a consumer. A dedicated page displaying your account details and subscription ID will be presented.
8. Record your subscription ID, essential for your consuming contract, to be added to your subscription subsequently.
# Creation and Deployment of VRF-Consumer Contract
> Note:- Steps will remain the same for mainnet deployment as well except the contract deployment in the 3rd step.
1. For this demonstration, utilize the vrf\_subscription\_consumer\_xdc\_apothem.sol contract. This contract imports dependencies including VRFConsumerBaseV2.sol, VRFCoordinatorV2Interface.sol, and ConfirmedOwner.sol.
2. The contract incorporates preconfigured values for requisite request parameters such as vrfCoordinator address, gas lane keyHash, callbackGasLimit, requestConfirmations, and the number of random words, numWords. For this scenario, specify only the subscriptionId during contract deployment.
3. Open and copy the [vrf\_subscription\_consumer\_xdc\_apothem.sol](https://github.com/GoPlugin/plugin_vrf_subscription_consumer_contract/blob/main/vrf_subscription_consumer_xdc_apothem.sol) contract to remix for apothem, and for mainnet open the following contract[ ](https://github.com/GoPlugin/plugin_vrf_subscription_consumer_contract/blob/main/vrf_subscription_consumer_xdc_mainnet.sol)[vrf\_subscription\_consumer\_xdc\_mainnet.sol ](https://github.com/GoPlugin/plugin_vrf_subscription_consumer_contract/blob/main/vrf_subscription_consumer_xdc_mainnet.sol)in remix.
4. Compile the vrf\_subscription\_consumer\_xdc\_apothem contract on the Compile tab in Remix.
5. Configure deployment settings. Select the Injected Provider environment and the vrf\_subscription\_consumer\_xdc\_apothem contract from the contract list on the Deploy tab in Remix. Specify your subscriptionId to allow the constructor to set it. 
6. Click the Deploy button to initiate on-chain deployment of your contract. MetaMask prompts confirmation of the transaction.
7. Upon contract deployment, copy the contract address from the Deployed Contracts list in Remix. Subsequently, add this address as an approved consuming contract on your subscription account before requesting randomness from VRF.
8. Access the [Subscription Manager](http://vrf.goplugin.co/) and select the ID of your new subscription under the My Subscriptions list to view subscription details.
9. Under the Consumers section, click Add consumer.
10. Input the address of your recently deployed consuming contract and click Add consumer. MetaMask prompts confirmation of the transaction.
11. Deployment and Approval of Example Contract
Your example contract is now deployed and approved for utilization of your subscription balance to facilitate VRF requests. Next, proceed to request random values from Plugin VRF.
# Requesting Random Values
The deployed contract sends requests for random values to Plugin VRF, acquires those values, constructs a struct RequestStatus, and stores it within mapping s\_requests.
1. Navigate back to Remix and review the available functions of your deployed contract listed under Deployed Contracts.
2. Execute the requestRandomWords() function on your contract to trigger the request. MetaMask prompts confirmation of the transaction. Upon approval, Plugin VRF processes your request, fulfills it, and returns the random values to your contract via a callback to the fulfillRandomWords() function. Subsequently, a new key requestId is appended to the mapping s\_requests.
Given the prevailing conditions of the testnet, anticipate a brief interval before the callback delivers the requested random values to your contract.
# PLISwap - How to instructions
To ensure a smooth experience with Plugin Bridge functionalities, users are encouraged to follow these instructions:
This guide offers a step-by-step manual for users engaging with the Plugin Bridge. It covers essential actions such as logging in, token locking, minting, importing tokens, integrating Polygon Network feeds, and unlocking tokens in the XDC Network. Currently, the bridge is available for Polygon Mumbai & Mainnet, soon we will open this for other chains as well. Down below, you could see the instructions to perform PLI swap between XDC Apothem to Polygon Mumbai.
### Login PLI Swap
\- Access:
\- Requirement: Possess Testnet PLI tokens in the XDC Network.
\- Note: Obtain Testnet PLI Tokens for Apothem TestNet at
\- And then click Connect Wallet
### Lock & Mint tokens in XDC Network
\- Procedure: Lock a specified volume of tokens in the XDC Network to mint an equivalent amount on the Polygon network. Click on “Mint on Polygon”.
### Import Minted Tokens into Mumbai Testnet
\- Action: After minting tokens on the Polygon network, import them into the Mumbai Testnet.
\- PLI Token on Polygon Contract Address: 0x26FD686728D7bFEfD575592e1ef75E607EB1A209

### Integrate Feeds
* Access feeds platform to consume the data from polygon network
*
https://feeds.goplugin.co
### Unlock PLI in XDC Network
\- Unlocking Procedure: Burn the tokens minted in the Polygon network to unlock PLI tokens in the XDC Network.
### Example
Let’s take a look at the following example to understand how it works
1\. Locking Tokens (User A)
\- Action: User A locks 100 PLI tokens in the XDC Network.
2\. Minting Tokens (User A)
\- Outcome: User A receives 100 PLI tokens minted in the Polygon Network.
3\. Spending Tokens (User A)
\- Transaction: User A spends 10 PLI as an Oracle fee in the Polygon Network.
4\. Burning Tokens (User A)
\- Action: User A can now burn only 90 PLI tokens in Polygon to unlock their 90 PLI tokens in the XDC Network.
### NOTE
* Only Metamask wallet is currently supported; ensure your Testnet for XDC & Polygon is enabled in Metamask.
* Our development team is actively working on adding support for other wallets and networks as we expand our capabilities.
* This document is subject to change based on future network onboarding.
Reach out to us on Discord if you face any issues
# Introduction
{% hint style="info" %}
**The Plugin Data Feed module has been improvised to make it easier for the Node operators and the end consumers to provide and consume data feed from Plugin.**
{% endhint %}
### **Hardware Specification for Participating as Data Feed Provider:**
Below mentioned is the infrastructure specification for the node to participate as validator node for data feed provider platform.
**1) RAM Memory:** **Minimum 8GB**
**2) Disk Space: Minimum 250GB**
**3) Uptime: 24/7**
**4) Cloud space/VPS: AWS(Amazon Web Services) - Recommended.**
**IMPORTANT NOTE:** Member should possess strong technical knowledge in **"Linux"** to setup, operate and maintain the node without any down time.
# End data consumers - Mainnet
(If you are a price feed consumer then follow below steps)
Explore & check which contract fulfills your requirement for the required price index pairs (Example: XDC-USDT, PLI-USDT, BTC-USDT, etc.,).
**STEP 1:**
Click on "Data Feeds" on the navigation bar and then click on “All Feeds”.
**STEP 2:**
Choose the Index Pair and click "view" as shown in the image below.
**We’ll take PLI/USDT as an example**
**STEP 3:**
Click on “View” on the above page for “PLI/USDT” and then you’ll find the screen below
**STEP 5:**
This screen will pop up as shown below :
The area highlighted in “red” shows the Oracle address/addresses used for this data feed pair, for example here, we have 3 oracles with a minimum of 2 responses needed to fetch the current answer.
The area highlighted in “blue” shows the “Network” and “Source Type” used for this data feed pair
The area highlighted in “green” and “Source of Trust” shows the sources used for this data feed pair with 2 sources for PLI/USDT.
**STEP 6:**
To retrieve the price of the PLI/USDT, to integrate the contract, copy-paste the contract to remix.
**STEP 7:**
Copy the constructor address (highlighted in pink), pass this address, and deploy the contract.
**STEP 8:**
Once your contract is deployed,” click on “fetchLatestAnswer”. And you’ll get the current value of “PLI/USDT”.
You can also “[Contact Us](https://mail.google.com/mail/u/0/?fs=1\&to=support@goplugin.co\&su=Customization%20needed\&body=\&tf=cm)” for a customized feed pair.
# End data consumers - Apothem
(If you are a price feed consumer on Apothem testnet, then follow below steps)
NOTE: To get Apothem PLI & XDC tokens in your wallet, please follow the link ""
Explore & check which contract fulfills your requirement for the required price index pairs (Example: XDC-USDT, PLI-USDT, BTC-USDT, etc.,).
**STEP 1:**
Click on "Data Feeds" on the navigation bar and then click on “All Feeds”.
**STEP 2:**
Choose the Index Pair and click on the view button on the "Action".
We’ll take PLI/USDT in apothem as an example
**STEP 3:**
Click on “View” in the above page for “PLI/USDT” and then you’ll find the screen below
The area highlighted in “red” shows the Oracle address/addresses used for this data feed pair
The area highlighted in “blue” shows the “Network” and “Source Type” used for this data feed pair
The area highlighted in “green” and “Source of Trust” show the sources used for this data feed pair.
**STEP 4:**
To retrieve the price of the PLI/USDT, integrate the contract in the black window than can be seen in the image above, and copy-paste the contract to remix,
**STEP 5:**
Copy the constructor address (highlighted in pink), pass this address, and deploy the contract.
**STEP 6:**
Once your contract is deployed, click on “fetchLatestAnswer”. And you’ll get the current value of “PLI/USDT”.
You can "[Contact Us](https://mail.google.com/mail/u/0/?fs=1\&to=support@goplugin.co\&su=Customization%20needed\&body=\&tf=cm)" for customized feeds.
# Benefits
**BENEFITS TO NODE OPERATORS:**
* Be a "recognized" Validator" in the Plugin ecosystem.
* Though it is minimal to start with, earnings through this validator node will be an additional revenue stream.
* For an instance, 1000 hits will make it to 1000\*0.01 = 10 PLI (assuming 0.01 is an oracle fee set by you).
* More the Index Pair you set, the better the hit rate from defi applications.
* Better response rate, will earn you a "Super Node Badge" from Plugin which in turn will draw the attention of the data feed users to pick your index pair.
Note : Whenever any end consumer consumes data from a specific node with the help of the deployed Internal contract address, a transaction fee (setup by node operators \~0.1 PLI) will be transferred from the consumer to the Node operator’s oracle contract. The token from the oracle contract can then be withdrawn to the respective wallet.
**BENEFITS TO DATA FEED USERS:**
* The User Interface is fast and easy to work on.
* The Data Feed charge is pocket friendly and very affordable in competition to other data feed providers.
* The data feed users will have the liberty to choose.
* Here you will have multiple options to choose from, be it sources or be it currency exchange and also a wide variety of data feeds in the Plugin data feed library.
* There are more than 1 source for some currency exchange, and the best thing is that it is visible on the data feed as well. That implies full transparency.
* The users can place their request on “” if a particular data is not found in the data feed list.
* The data we provide is real-time information provided by our data feed operators who are chosen after a strict procedure to ensure high-quality data.
* The feeds are strictly monitored, so there are no discrepancies in the result.
**BENEFITS TO DATA FEED PROVIDERS:**
* Consumption of your API services will be very high and the product of that will be an increase in earnings.
* There will be a huge flow of traffic toward your API.
* Data feed providers will be sharing their high-quality data with smart contract developers and applications.
* The reach of your data will be immense and will only go upward.
* Data feed providers will also get the opportunity to customise API calls on user demands.
* Providers will have the ability to provide different data as per the user’s request and even make additions in case the service isn’t available, which in turn will help your service to grow.
* Easily integrate the API into our Plugin Ecosystem.
# Introduction
> **As part of the ongoing transition of Plugin from version 1.0 to 2.0, Plugin governance committee after a thorough assessment has decided to discontinue Re-staking and Top-ups to the staking.**
Plugin’s Restaking model offers our node members an easy-to-use interface, where node operators can verify their stakes and restake the tokens.
This feature is to automate the staking process, with one click the restaking will be enabled and the restaking of tokens will become automated and members can earn rewards for the same without much hassle.
The main objective of this feature is to increase user flexibility and transparency. To enable Rewards or Restaking we have added a new toggle button on the Dashboard, and in one click you will be able to enable restaking for all your nodes. A chart will be displayed on the Dashboard showing the currently available tokens for top-up and Restake. Once Restake is enabled the tokens will be locked for one year and the user will receive the rewards for the restaked tokens.
Restaking can be activated only for active nodes. If a member has 4 active nodes, once restaking is enabled then the model will be activated for all 4 nodes.
Once Restaking is activated, Restake will happen automatically once the rewards for stake reach 1000 tokens on the specific node (if the total staked tokens on the node is greater than 10,000).
If the total staked tokens are less than 10,000 but restaking is enabled, then the rewards will be top-up to the tokens until it crosses 10,000 total staked tokens.
The rewards for staking will be restaked and the rewards for restaking the tokens will be sent to their respective wallets.
# Scenarios in Re-staking Model
> **As part of the ongoing transition of Plugin from version 1.0 to 2.0, Plugin governance committee after a thorough assessment has decided to discontinue Re-staking and Top-ups to the staking.**
The following are examples of 2 scenarios that will help you understand the Restaking Model a little better.
* **Scenario 1:** A fully staked node (2000 stake plus 18000 top-up - 20,000 PLI Total)
If enabled, restaking happens automatically for every 1000 PLI tokens earned. The operator continues to earn 10% on the original 10,000 PLI and begins to earn 2.5% on the amount over 10,000 PLI that is restaked. The newly staked PLI is locked for one year.
* **Scenario 2:** A staked but not fully topped-up node (i.e. 2000 staked plus 4000 top-up - 6000 PLI Total)
If enabled, top-up happens automatically for every 500 PLI tokens earned. The operator will earn 10% on the original 6000 PLI and also earn 10% on the top-up amount until the node becomes fully staked at 20,000 PLI. The newly staked PLI is locked for one year. Once fully staked, the procedure in Scenario 1 becomes in force.
# Benefits To Node Members
1. Once, Restaking is enabled, the entire process becomes automated.
2. Restaked tokens will be locked for 1 year and you will receive 2.5% of the restaked tokens as monthly rewards when you cross 10k staked tokens on your node. And in case your total staked tokens are less than 10k, then you will continue to receive 10% of the staked tokens.
3. The tokens will be locked for 1 year, and if the node gets deactivated due to any issues, the member will continue to receive the rewards for restaking as it will be locked for one year.
4. Restaking once selected will be applied to all the active nodes.
5. Rewards on the restaked tokens will be provided to the member every month.
6. Each node will have an individual restaking ID and the chart with the details specific to that node will be displayed on the dashboard.
# Steps for Restaking
Here are the steps you need to know, to enable the restaking model for your node.
* To Enabled Restaking, a toggle button is created on the dashboard to enable the restaking model for all your active nodes.
{% hint style="info" %}
Note - If restaking is not enabled, then the rewards will be sent to your wallet and won’t be restaked.
{% endhint %}
* Once Restaking is selected then the rewards will not be sent to the wallet but instead added to Restaking / Top-up and you will receive the rewards for those restaked tokens.
* In case you activated Restaking, but the total staking on your node is less than the maximum stake of 20,000 then the Rewards will be added as a top-up stake and you can check the details on the Stake Menu.
* Once the total of Top-up stake rewards crosses 500 tokens, then the status will be updated to “Yet to Stake “ followed by which the Governance Committee will stake the tokens on your behalf. And once this is done, the status will get updated to “Stake”
* A chart specific to each node with a restaking ID will appear on the Dashboard showing the currently available tokens for top-up and restake.
* Once the total staking on the Node reaches the maximum stake of 20,000 then the Rewards will be added to the Restaking and can be checked on the Restake Menu.
* Once activated restaking will happen automatically once the top-up rewards reach 1000 tokens (If the total staked tokens on a node are greater than 20,000).
* As you can see in the above image, the user will be able to view the automated Restake by us on their behalf, the already staked tokens, and the tokens that are yet to be restaked.
* The yet-to-stake tokens are the rewards for the re-stake that get accumulated until they reach 1000 tokens, after which those 1000 tokens will also be added to the “Total Restake”.
# Known-Issues
#### Remix - Contract Deployment
When you deploy a contract via Remix, it will not show the contract instance but get deployed successfully. In that scenario, follow these steps
Step 1 - Copy your transaction and explore in -- >
Step 2 - Copy the contract address and paste that address in "At address"
Step 3 - Once the address is pasted, click "At Address" and you should be able to see the contract instance below

#### external-initiator - No such help topic is available
{% hint style="info" %}
External initiators are disabled on nodes by default. Set the `FEATURE_EXTERNAL_INITIATORS=true` configuration variable to enable this feature.
{% endhint %}
#### external-initiator command not found
* Ensure " go install " worked fine
* Login & logout from your terminal
#### () received bad response '401 Unauthorized"
* session logged out, try login again
#### WebSocket: bad handshake (Http status 502 bad gateway)
* WebSocket connectivity is down, check your node logs and observe what's going on
#### external-initiator: record not found
* record name\ you create during below step and the record mentioned in the "job-spec" while creating job should be same
```
plugin initiators create
```
#### external-initiator: record not found
select \* from external-initiators; ==> Gives you record name you defined
select \* from endpoints ==> gives you endpoint you created
#### How to kill the existing docker containers
* sudo docker ps -qa|xargs sudo docker stop
* sudo docker ps -qa|xargs sudo docker rm
# Open-Issues
## 1. Hardhat: Upgradeable Proxy support for XDC
Unable to set up an upgradeable proxy contract using Hardhat features. The setup is working fine with another EVM-compatible blockchain.
Can we look into this?

How to replicate this issue?
```
const { ethers, upgrades } = require("hardhat");
async function main() {
// const gas = await ethers.provider.getGasPrice();
const CLCStakePool = await ethers.getContractFactory("CLCStakePool");
console.log("Deploying stakePool...");
const v1contract = await upgrades.deployProxy(CLCStakePool,[]);
await v1contract.waitForDeployment();
console.log("Contract deployed to:", await v1contract.getAddress());
}
main().catch((error) => {
console.error(error);
process.exitCode = 1;
});
```
Use this deployment script, and replace the contract with your own contract.
Expected results: it should deploy the contract fine and provide the contract address
Actual Results: Erroring out with "ProviderError: too many arguments, want at most 1"
## 2. HeadTracker is not capturing a few blocks in Apothem / Mainnet
We have been witnessing this issue recently, when we setup Plugin2.0.
These issues have not occurred before, but recently. To check the issues, we have executed the Plugin2.0 in "Polygon" and also in "XDC Mainnet". Logs for both executions is captured below.
Actual issue?
* In Plugin, when we configure more than 4 jobs, the execution is failed resulting in the following error
> 2023-09-25T12:48:34.707+0530 \[ERROR] Error in new head subscription, unsubscribed headtracker/head\_listener.go:67 err=websocket: close 1000 (normal) evmChainID=50 logger=EVM.HeadTracker.HeadListener stacktrace=github.com/GoPlugin/pluginV2/core/chains/evm/headtracker.(\*headListener).ListenForNewHeads
When we execute the same against the "Polygon" chain, it runs without any issues.
Logs:-

The log shows that "headtracker is missing" a block, due to which we face "RPC node is not reachable" and it is on & off and unstable.
Head & Block logs for Polygon:
For XDC:
You may see the difference in the XDC Log, where the blocks are missing.
Note: We have tested the available RPC from "" for Apothem & Mainnet and the results are the same.
Let us know if you need some more information to debug.
Kindly review and let us know the possible solutions.
# How to install Plugin 1.0 Node
Plugin node can be installed in 3 ways
## System Requirements
{% hint style="info" %} **At present, in accordance with the Governance Committee's decision, we are not accepting any new nodes. To remain informed about the most recent Plugin advancements, kindly watch out for announcements on Discord.**
{% endhint %}
Operating System - Ubuntu / Linux Kernel Version 20.04
RAM - 2GB (Minimum) - More the better \
For better performance of the node, please use RAM of 5GB
Storage Space - 50 GB
Cloud hosting is better to provide high availability and good reputation
## How easy the installation is?
We are recommending Ubuntu OS to have quick & easy installation
Setting up the Plugin node requires good technical expertise, but we are trying to minimize the effort by heavy lifting them through three modes of installation.
* Modular Method for Deployment(Recommended Approach)
* If you are following this approach, then "you are not required to follow "Enabling HTTPS Connections" separately. This approach takes care of https setup.
* Script Method
* Docker Method
The results of these methods is the same, but they work differently. The modular approach gives you complete flexibility and is recommended.
Choose the one you find easy, depending on your expertise, and start setting up your own nodes.
{% hint style="info" %} **Be cautious to fund your Node address only with the required Tokens for testing (1 to 5PLI max) DO NOT FUND MORE THAN THIS!**
**The user or the Plugin Team will not be able to withdraw any tokens that have been purposefully or mistakenly transferred to a Node address.**
{% endhint %}
# Modular Method Deployment (Recommended Approach)
{% hint style="info" %}
Read through the README.md for clear instructions - [Click here](https://github.com/GoPlugin/plugin-deployment/blob/main/docs/node_autosetup.md)
{% endhint %}
A special thanks to the contributor @inv4fee2020 (discord id) for the great work & thanks to all the community members for the feedback to improvise the same.
Step 1 - Logon as root to your new VPS
Due to the various experiences across different VPS hosting platforms, let's update the system & add in base packages before proceeding;
```
sudo apt update -y && sudo apt upgrade -y && sudo apt install -y git nano curl && sudo apt autoremove -y
```
Step 2 - Create a new admin user account -- Copy the below text into a local text editor on your pc/laptop e.g. notepad -- Change '**my\_new\_user**' & '**my\_new\_password**' for your values and paste the code to the terminal
```
sudo groupadd my_new_user
sudo useradd -p $(openssl passwd -6 my_new_password) my_new_user -m -s /bin/bash -g my_new_user -G sudo
```
Step 3 - Now open a new terminal session to your VPS and login with your new admin user account and complete the rest of the steps.
Step 4 - Once logged on as your new admin user - run the following commands;
\
\- Now we clone down the install scripts repository
```
cd $HOME
git clone https://github.com/GoPlugin/plugin-deployment
cd plugin-deployment
chmod +x *.sh
```
After you git cloned Follow the node\_autosetup**.**md **instructions further**
{% embed url="" %}
# Script Method (Legacy)
{% hint style="info" %}
Please follow the "Modular Method Deployment" Approach if you want to follow script-based installation [(Link here)](https://docs.goplugin.co/plugin-installations/how-to-install-plugin-node/modular-method-deployment-recommended-approach)
{% endhint %}
Through the bash/shell scripting method, you will be able to install the complete setup in a few steps
# Script - Phase 1
Through the bash / shell scripting method, you will be able to install the complete setup in few steps
> plugin-deployment
{% hint style="info" %}
Please ensure, you have git & curl command installed already. If not, use the following command
sudo apt install git
sudo apt install curl
{% endhint %}
**`Please install an editor of your choice(like vim, nano etc.,) to edit files during installation`**
Do a git clone and perform the following actions
git clone
cd plugin-deployment
There are two scripts in this folder namely,
* 1\_prerequisite.bash
* 2\_nodeStartPM2.sh
Create two files namely '.env.apicred', '.env.password', by using the below mentioned command in terminal.
```
touch .env.apicred
touch .env.password
```
put - the credentials in below format in '.env.apicred' file - these credentials helps you to login your Plugin GUI
```
emailid
password
```
put - password(very strong) in '.env.password' file and it should follow specific format, which is given under NOTE
```
keystorepassword
```
#### NOTE:
```
.env.password => contains your Keystore password
# *** KEYSTORE PASSWORD SHOULD FOLLOW THESE CONDITIONS ***
# “must be longer than 12 characters”,
# “must contain at least 3 lowercase characters”,
# “must contain at least 3 uppercase characters”,
# “must contain at least 3 numbers”,
# “must contain at least 3 symbols”,
# “must not contain more than 3 identical consecutive characters”.
```
{% hint style="info" %}
Before triggering 1\_prerequisite.bash, please ensure to change the password at line number 203. The password should be a strong one as it is a Postgres password. Keep in mind that, the password should not have \* or @ characters
{% endhint %}
Open the terminal, go to a specific folder, and trigger the bash file like below
> ./1\_prerequisite.bash
What it does?
* It installs all prerequisites for the plugin environment.
* If your system already has a few packages that are necessary for Plugin environment, then the packages will throw error/warning messages and override the same.
* It is always recommended to go with fresh VPS or Machine
# Script - Phase 2
After the successful execution of Phase 1, follow this Phase 2 to complete the script way installations
{% hint style="info" %}
Before proceeding to the next step, please **change the default contents of ‘.env.apicred’ & ‘.env.password’ to your own credentials** **and safely keep a note of this contents.** It is important to keep a note of this password somewhere.
{% endhint %}
```
#####################################################################################
IMPORTANT MESSAGE
########################################################################################
# Make sure you have the below-mentioned 2 files available and populated as given below.
# Then start 'pm2 start 2_nodeStartPM2.sh' script to run your
# node in the background. To view your node log use 'pm2 logs 0'.
#
# File 1: .env.password => contains your Keystore password
# *** KEYSTORE PASSWORD SHOULD FOLLOW THIS CONDITIONS ***
# “must be longer than 12 characters”,
# “must contain at least 3 lowercase characters”,
# “must contain at least 3 uppercase characters”,
# “must contain at least 3 numbers”,
# “must contain at least 3 symbols”,
# “must not contain more than 3 identical consecutive characters”.
#
# File 2: .env.apicred => first line of the file contains #email id for UI
# second line of the file contains a password for UI
# (This password should be strong, but need not follow the Keystore password condition).
#
#
# NOTE: These files have default contents, please change the mail & passwords before
starting 'pm2 2_nodeStartPM2.sh #start'.
###########################################################################################
###########################################################################################
```
{% hint style="info" %}
**Edit the file 2\_nodeStartPM2.sh** file and change the **last line**
**from**
plugin node start -d -p password.txt -a apicredentials.txt
**to**
plugin node start -d -p .env.password -a .env.apicred
{% endhint %}
Save and submit!,
{% hint style="info" %}
**Password must be kept safe & secure else, there is no way to retrieve it** and the funds managed by the private key will also get lost.
Each time you start/restart your node, you will have to enter this password to unlock the Keystore. The node requires to sign the transaction through the private key of the Keystore and submit it to the blockchain.
{% endhint %}
After you change the credentials submit the following command
> **pm2 start 2\_nodeStartPM2.sh**
You should be able to view the logs on the console and also the list of existing jobs using the below command
> **plugin jobs list**
If you do not have any issues, you should be able to see the Plugin node using the below URL
>
Replace the localhost with your public/remote IP if you are running this in VPS
*Once you reached this point successfully, next go to* [**Core Adapters**](https://docs.goplugin.co/plugin-installations/core-adapters)
# Docker Method
Running the node through docker container minimizes the hassle to install the required utilities for running the node.
In this method, we advocate the user to install the database(PostgreSQL) in a host machine, and the containerized image is connected with the PostgreSQL in the host. So, their database will remain unaffected when the user accidentally stops the container.
{% hint style="info" %}
The docker method of running the node is tried and tested in the below-mentioned environments.
{% endhint %}
1\. Standalone host OS: Ubuntu Linux — 20.04\
2\. AWS EC2 hosted OS: Ubuntu Linux — 20.04
In environments other than those mentioned above, the setup steps may not work, we are trying to set it up in other environments, and you will hear from us on this.
Follow Phase 1 - This will help you to set up & run the Plugin node
Follow Phase 2 - This will help you set up an external initiator and set up a job.
```
```
# Docker - Phase 1
Setup Postgres, Docker, Pull Plugin Docker Image & Setup Plugin Node
{% hint style="info" %}
Please ensure, you have git & curl command installed already. If not, use the following command
sudo apt install git
sudo apt install curl
{% endhint %}
#### Step 1 - Download the Plugin Installation Script
**NOTE: If you are having root access, please don't install from /root folder, better start from /home**
```
git clone -b docker_branch_v1 https://github.com/GoPlugin/plugin-deployment.git && cd plugin-deployment
```
#### Step 2 - Postgres Setup
{% hint style="info" %}
To set up custom password for PostgreSQL database execute the below mentioned command in plugin-deployment directory. The user needs to change the word ‘password’ to their own password for the database.
{% endhint %}
```
perl -i -p -e 's/plugin1234/yourpassword/g' postgresInstall.bash plugin.env ei.env
```
For example, here the password we are setting is 'yourpassword', **please change it to your custom password**.
**NOTE: Don't use any special characters, just alphanumeric password is sufficient**
```
perl -i -p -e 's/plugin1234/mypassword/g' postgresInstall.bash plugin.env ei.env
```
#### What's inside the plugin.env?
```
ETH_CHAIN_ID=50
ETH_URL=wss://pluginws.blocksscan.io
MIN_OUTGOING_CONFIRMATIONS=2
PLI_CONTRACT_ADDRESS=0xff7412ea7c8445c46a8254dfb557ac1e48094391
PLUGIN_TLS_PORT=0
SECURE_COOKIES=false
ALLOW_ORIGINS=*
DATABASE_TIMEOUT=0
FEATURE_EXTERNAL_INITIATORS=true
PLUGIN_DEV=true
DATABASE_URL=postgresql://postgres:plugin1234@172.17.0.1:5432/plugin_mainnet_db?sslmode=disable
ENABLE_EXPERIMENTAL_ADAPTERS=true
POSTGRES_USER=postgres
POSTGRES_PASSWORD=plugin1234
POSTGRES_DB=plugin_mainnet_db
```
Install PostgreSQL & Config PostgreSQL: (Just copy and paste each line) and make sure there is no error before you move on to the next line of commands
```
1) /bin/bash postgresInstall.bash
2) sudo perl -i -p -e "s/^\#listen_addresses.*$/listen_addresses = \'172.17.0.1\'/" /etc/postgresql/12/main/postgresql.conf
3) sudo chmod 666 /etc/postgresql/12/main/pg_hba.conf
4) sudo echo "host all all 172.17.0.1/16 md5" >>/etc/postgresql/12/main/pg_hba.conf
5) sudo pg_ctlcluster 12 main start
```
#### Step 3 - Setup Docker
```
sudo apt update
sudo apt install apt-transport-https ca-certificates curl software-properties-common
curl -fsSL https://download.docker.com/linux/ubuntu/gpg | sudo apt-key add -
sudo add-apt-repository "deb [arch=amd64] https://download.docker.com/linux/ubuntu focal stable"
apt-cache policy docker-ce
sudo apt install docker-ce
sudo systemctl status docker
```
#### Step 4 - Pull Plugin image
```
sudo docker pull goplugin/pluginode:v1
For latest docker image(in which Pli balance will be reflecting in Keys), please
use the v2 version of docker image:
sudo docker pull goplugin/pluginode:v2
```
Step 5 - Copy down the image ID using below command
```
sudo docker images
```

#### Step 6 - Change your credentials
{% hint style="info" %}
It is important to change the credentials in these two files, inside the plugin-deployment directory.
These files are hidden files and you can edit using below command
{% endhint %}

* **.env.password**
* This is the password that helps generate and secure the Keystore wallet. Basically, your Plugin node will generate a wallet and this password is key to the same.
* It follows certain standards and password conditions which you can get it from here
* ```
# *** KEYSTORE PASSWORD SHOULD FOLLOW THIS CONDITIONS *** #
# “must be longer than 12 characters”,
# “must contain at least 3 lowercase characters”,
# “must contain at least 3 uppercase characters”,
# “must contain at least 3 numbers”,
# “must contain at least 3 symbols”,
# “must not contain more than 3 identical consecutive #characters”.
```
For example -
* 
* **.env.apicre**d
* This file has credentials that allows you to log in to PLUGIN GUI
* You can use your email ID & password of your choice
* 
{% hint style="info" %}
Once the above files are updated, then you can proceed to the next!
{% endhint %}
#### Step 7 - Override the Image ID in the below command and run the docker container
```
sudo docker run --env-file plugin.env -it -d -p 6688:6688 -p 8080:8080 -v :/pluginAdm --add-host=host:192.168.0.1
```
For example, after you change the image ID, the command should be-
```
sudo docker run --env-file plugin.env -it -d -p 6688:6688 -p 8080:8080 -v /home/ubuntu/plugin-deployment:/pluginAdm --add-host=host:192.168.0.1 ac37806848a0
```
Once it is successful, you will see something like this

#### Step 8 - Get the container ID using the below command
```
sudo docker ps -a => Get the
```

Step 9 - Change the container\_ID in below command and execute from your directory
```
sudo pg_ctlcluster 12 main restart
sudo docker exec -it /bin/bash -c ". ~/.profile && pm2 start /pluginAdm/startNode.sh"
```
For instance
```
sudo docker exec -it 59961fcd0f4f /bin/bash -c ". ~/.profile && pm2 start /pluginAdm/startNode.sh"
```
Your node will start with status as ‘online’.
If you want to probe your running node, then you can use the command format given below.
```
sudo docker exec -it /bin/bash -c ". ~/.profile && "
```
You can replace \ with
\- pm2 status\
\- pm2 logs 0
### Video Tutorial for this section -
{% embed url="" %}
# Docker - Phase 2
After the successful execution of Phase 1, you should follow the below steps to set up an external-initiator and bridge the event.
Step 1 - Run the below command to login the Plugin node via CLI
```
sudo docker exec -it /bin/bash -c ". ~/.profile && plugin admin login -f /pluginAdm/.env.apicred"
```
For example - From Phase 1, the container\_Id is -> 59961fcd0f4f
```
sudo docker exec -it 59961fcd0f4f /bin/bash -c ". ~/.profile && plugin admin login -f /pluginAdm/.env.apicred"
```
Step 2 - Run the below command to create a record using external-initiator
```
sudo docker exec -it /bin/bash -c ". ~/.profile && plugin initiators create pluginei http://localhost:8080/jobs"
```
After replacing the container\_id the command below is
```
sudo docker exec -it 59961fcd0f4f /bin/bash -c ". ~/.profile && plugin initiators create pluginei http://localhost:8080/jobs"
```
Successful execution will result in the below output
```
╬══════════╬════════════════════════════╬══════════════════════════════════╬══════════════════════════════════════════════════════════════════╬══════════════════════════════════════════════════════════════════╬══════════════════════════════════════════════════════════════════╬
║ NAME ║ URL ║ ACCESSKEY ║ SECRET ║ OUTGOINGTOKEN ║ OUTGOINGSECRET ║
╬══════════╬════════════════════════════╬══════════════════════════════════╬══════════════════════════════════════════════════════════════════╬══════════════════════════════════════════════════════════════════╬══════════════════════════════════════════════════════════════════╬
║ pluginei ║ http://localhost:8080/jobs ║ ac3f582257d04a93a4c02d93b6425cf2 ║ y6c6mJI+27tVK1Lro6D1mNZ9GYQu/LXOdHZXlZZSVyqJrxAe0y6kfK5QF+EJY4qY ║ f6ZZBaMfBxm0ZcRQUkgMe/TApjE4VP0jOt2b2Bi+UDqSw05jb/IZl09cDVsfb4cF ║ ts3H54xnNSWZQo4WyImTXn6LKg1ymmx6gy0zu9p076bNo/kqSR0V6Yrck3IF1iti ║
```
Step 3 - Just apply this key information in "ei.env" file in the order you see

Step 4 - Finally, run the below commands to start the "external initiator"
```
sudo docker exec --env-file ei.env -it /bin/bash -c ". ~/.profile && pm2 start /pluginAdm/startEI.sh"
```
Change the container\_id to yours.. For example, here it is
```
sudo docker exec --env-file ei.env -it 59961fcd0f4f /bin/bash -c ". ~/.profile && pm2 start /pluginAdm/startEI.sh"
```
You should see two jobs running in the PM2 list. To verify the same, apply the below command
```
sudo docker exec -it /bin/bash -c "pm2 list"
```
sudo docker exec -it 59961fcd0f4f /bin/bash -c "pm2 list"

If you see it online!, you are good to proceed and skip the "EXTERNAL INITIATORS" section and jump onto the "ORACLE" section.
### Video Tutorial for this section -
{% embed url="" %}
# Core Adapters
Core adapters are the built-in functionality that every Plugin node supports. Strung together, they act as tasks that need to be performed to complete a Job. Adapters that are prefixed with "Eth" refer to tasks that post data onto the chain. Here are some examples of the data types that adapters convert data to.
| Name | Core Adapter | Ethereum Data Type |
| ----------------- | ------------ | ------------------ |
| Signed Integers | EthInt256 | int256 |
| Unsigned Integers | EthUint256 | uint256 |
| Bytes | EthBytes32 | bytes32 |
| Boolean | EthBool | bool |
### Compare
This core adapter compares a user-specified value with the value from the previous adapter's result.
**Parameters**
* `operator`: The operator used to compare values. You may use one of the following:
* `eq`: Equal
* `neq`: Not equal
* `gt`: Greater than
* `gte`: Greater than or equal to
* `lt`: Less than
* `lte`: Less than or equal to
* `value`: The value to check against the previous adapter's result. May be a string or a number, but if the value is a string, only `eq` and `neq` may be used.
**Solidity Example**
```
req.addInt("value", 10000);
req.add("operator", "gte");
```
### Copy
The core adapter walks the `copyPath` specified and returns the value found at that result. If returning JSON data from an external adapter, you will need to use this adapter to parse the response.
**Parameters**
* `copyPath`: Takes an array of strings, each string being the next key to parse out in the JSON object or a single dot-delimited string.
**Solidity Example**
For the JSON object:
```
{"RAW": {"ETH": {"USD": {"LASTMARKET": "_someValue"}}}}
```
You would use the following for an array of strings:
```
string[] memory path = new string[](4);
path[0] = "RAW";
path[1] = "ETH";
path[2] = "USD";
path[3] = "LASTMARKET";
req.addStringArray("copyPath", path);
```
Or the following for a single dot-delimited string:
```
req.add("copyPath", "RAW.ETH.USD.LASTMARKET");
```
**Job Specification Example**
```
{
"type": "Copy",
"params": {
"copyPath": [
"RAW",
"ETH",
"USD",
"LASTMARKET"
]
}
}
```
For arrays, you can access the path of an array by using the index. If this is your JSON:
```
{"endpoint": [ {"path":"value"}]}
```
You could get the `"value"` by:
```
req.add("copyPath", "endpoint.0.path");
```
### EthBool
The core adapter reads the given Boolean value and then converts it into Solidity's `bool` format.
**Parameters**
*None taken.*
### EthBytes32
The core adapter formats its input into a string and then converts it into Solidity's `bytes32` format.
**Parameters**
*None taken.*
### EthInt256
The core adapter formats its input into an integer and then converts it into Solidity's `int256` format.
**Parameters**
*None taken.*
### EthTx[](https://docs.chain.link/docs/core-adapters/#ethtx)
The core adapter takes the input given and places it into the data field of the transaction. It then signs an Ethereum transaction and broadcasts it to the network. The task is only completed once the transaction's confirmations equal the `MIN_OUTGOING_CONFIRMATIONS` amount.
If the transaction does not confirm by the time `ETH_GAS_BUMP_THRESHOLD` number of blocks have passed since initially broadcasting, then it bumps the gas price of the transaction by `ETH_GAS_BUMP_WEI`.
**Parameters**
* `address`: The address of the Ethereum account which the transaction will be sent to.
* `functionSelector`: **(optional)** the function selector of the contract which the transaction will invoke. `functionSelector` is placed before `dataPrefix` and the adapter's input in the data field of the transaction.
* `dataPrefix`: **(optional)** data which will be prepended before the adapter's input, but after the `functionSelector` in the transaction's data field.
* `value`: **(optional)** data to send to the function, will append after the `dataPrefix` payload if it's included. Will automatically come from the previous task.
### EthUint256[](https://docs.chain.link/docs/core-adapters/#ethuint256)
The core adapter formats its input into an integer and then converts it into Solidity's `uint256` format.
**Parameters**
*None taken.*
### HttpGet
The core adapter will report the body of a successful `GET` request to the specified `get` or return an error if the response status code is greater than or equal to 400.
**Parameters**
* `get`: Takes a string containing the URL to make a `GET` request to.
* `queryParams`: Takes a string or array of strings for the URL's query parameters.
* `extPath`: Takes a slash-delimited string or array of strings to be appended to the job's URL.
* `headers`: Takes an object containing keys as strings and values as arrays of strings.
**Solidity Example**
```
req.add("get", "http://example.com");
req.add("queryParams", "firstKey=firstVal&secondKey=secondVal");
req.add("extPath", "price/BTC/USD");
```
**Job Specification Example**
```
{
"type": "HttpGet",
"params": {
"get": "https://example.com/some-endpoint",
"headers": {
"X-API-Key": [
"abc123abc123abc123abc123"
]
}
}
}
```
{% hint style="info" %}
For security, since the URL may come from an untrusted source, HTTPGet imposes some restrictions on which IPs may be fetched. Local network and multicast IPs are disallowed by default and attempting to connect will result in an error.
{% endhint %}
If you really must access one of these IPs, you can use the `HTTPGetWithUnrestrictedNetworkAccess` adapter instead.
### HttpPost
The core adapter will report the body of a successful `POST` request to the specified `post`, or return an error if the response status code is greater than or equal to 400.
**Parameters**
* `post`: takes a string containing the URL to make a `POST` request to.
* `headers`: takes a object containing keys as strings and values as arrays of strings.
* `queryParams`: takes a string or array of strings for the URL's query parameters.
* `extPath`: takes a slash-delimited string or array of strings to be appended to the job's URL.
* `body`: the JSON body (as a string) that will be used as the data in the request.
*
**Solidity Example**
```
req.add("post", "http://post.example.com");
req.add("queryParams", "firstKey=firstVal&secondKey=secondVal");
req.add("extPath", "price/BTC/USD");
```
**Job Specification Example**
```
{
"type": "HttpPost",
"params": {
"post": "https://example.com/some-endpoint",
"headers": {
"X-API-Key": [
"abc123abc123abc123abc123"
]
}
}
}
```
{% hint style="info" %}
For security, since the URL may come from an untrusted source, HTTPPost imposes some restrictions on which IPs may be fetched. Local network and multicast IPs are disallowed by default and attempting to connect will result in an error.
{% endhint %}
If you really must access one of these IPs, you can use the `HTTPPostWithUnrestrictedNetworkAccess` adapter instead.
### JsonParse[](https://docs.chain.link/docs/core-adapters/#jsonparse)
The core adapter walks the `path` specified and returns the value found at that result. If returning JSON data from the HttpGet or HttpPost adapters, you must use this adapter to parse the response.
**Parameters**
* `path`: takes an array of strings, each string being the next key to parse out in the stringified JSON result or a single dot-delimited string.
**Solidity Example**
For the stringified JSON:
```
{"RAW": {"ETH": {"USD": {"LASTMARKET": "_someValue"}}}}
```
You would use the following for an array of strings:
```
string[] memory path = new string[](4);
path[0] = "RAW";
path[1] = "ETH";
path[2] = "USD";
path[3] = "LASTMARKET";
req.addStringArray("path", path);
```
Or the following for a single dot-delimited string:
```
req.add("path", "RAW.ETH.USD.LASTMARKET");
```
**Job Specification Example**
```
{
"type": "JsonParse",
"params": {
"path": [
"RAW",
"ETH",
"USD",
"LASTMARKET"
]
}
}
```
**Parsing Arrays**
```
req.add("path", "3.standardId");
```
The above example parses the 4th object of the following JSON response and returns 677 as a result:
```
[
{
"standardId": 20,
"name": "ERC-20"
},
{
"standardId": 721,
"name": "ERC-721"
},
{
"standardId": 1155,
"name": "ERC-1155"
},
{
"standardId": 677,
"name": "ERC-677"
}
]
```
### Multiply
The core adapter parses the input into a float and then multiplies it by the `times` field.
**Parameters**
* `times`: the number to multiply the input by.
**Solidity Example**
```
run.addInt("times", 100);
```
### NoOp
The core adapter performs no operations, simply passing the input on as output. Commonly used for testing.
**Parameters**
*None taken.*
### NoOpPend
The core adapter performs no operations, and marks its task run pending. Commonly used for testing.
**Parameters**
*None taken.*
### Quotient
Quotient
The core adapter gives the result of x / y where x is a specified value (dividend) and y is the input value (result).
This can be useful for inverting outputs, e.g. if your API only offers a USD/ETH conversion rate and you want ETH/USD instead you can use this adapter with a dividend of 1 to get the inverse (i.e. 1 / result).
**Parameters**
* `dividend`: the number which is divided by the result
### Sleep
The core adapter will pause the current task pipeline for the given duration.
ENABLE\_EXPERIMENTAL\_ADAPTERS
You must set `ENABLE_EXPERIMENTAL_ADAPTERS=true` in order to use the sleep adapter
**Parameters**
* `until`: the UNIX timestamp of when the job should stop sleeping and resume at the next task in the pipeline.
**Solidity Example**
```
req.addUint("until", now + 1 hours);
```
**Job Specification example**
```
{
"initiators": [
{
"type": "web",
"params": {
}
}
],
"tasks": [
{
"type": "sleep",
"params": {
"until": "1605651000"
}
}
]
}
```
# Fund your Node
It is important to fund your plugin node with minimal XDC and PLI to process the request.
### How to fund your node
* Login into your Plugin GUI by http\://\:6688
* Go to Key section

* Grab "address" from "Account Address" of Type "Regular"

* Go to XDCPay or MetaMask where you have XDC / PLI and transfer some funds.
{% hint style="info" %}
**It is not necessary to dump all the funds here. 10 XDC & 5PLI should be fine to start with.**
**Also, this is not staking!.. It is just to allow your plugin node to process the transaction if any, comes your way.**
**Be cautious to fund your Node address only with the required Tokens for testing (1 to 5PLI max) DO NOT FUND MORE THAN THIS!**
**The user or the Plugin Team will not be able to withdraw any tokens that have been purposefully or mistakenly transferred to a Node address.**
{% endhint %}
After transferring the funds, you should be able to see it in the PLUGIN GUI like this

# Introduction
{% hint style="info" %}
If you are following[ "Modular Deployment"](https://docs.goplugin.co/plugin-installations/how-to-install-plugin-node/modular-method-deployment-recommended-approach) approach for node installation, you can skip this EI setup, since it is covered in the Modular deployment script itself.
{% endhint %}
External initiators can listen to event and run for any webhook job that it has been linked to, so it is highly critical unit for Node to bridge with External-initiator and it can listen to events from client contract that uses the oracle.
External initiators allow jobs in a node to be initiated depending on some external condition. The ability to create and add external initiators to Plugin nodes enables blockchain agnostic cross-chain compatibility.
{% hint style="info" %}
External initiators are disabled on nodes by default. Set the `FEATURE_EXTERNAL_INITIATORS=true` configuration variable to enable this feature.
{% endhint %}
Initiator Bridges handle the authentication to and from the External Initiator and where to send the messages. When creating a Bridge two parameters are required:
Only the webhook job type can be initiated using an External Initiator.
The external initiator must be created before the webhook job, and must be referenced by name (whitelisted) in order for that external initiator to be allowed to trigger the given webhook job.
When the External Initiator is created it generates two pairs of credentials: Outgoing and Incoming. The Outgoing Access Key and Secret are used to authenticate messages sent from the Core to the External Initiator. The Incoming Access Key and Secret are used to authenticate messages sent from the External Initiator to the Core.
Then, once you've created the name, bridge, and have the correct access keys for the URL, you can proceed to use the external initiator as if it's a regular initiator in future job specs.
# Installation
git clone \
cd external-Initiator\
git checkout main
. \~/.profile\
go install
# Setup & Build
Initiate the initiators using Plugin
Step 1 - Go to terminal and login using "plugin admin login"
```
plugin admin login
```
use the credential (email id & password) set during plugin node installation
Step 2 - Create
```
plugin initiators create
```
**`NAME`**: The name you want to use for your external initiator.**(You now can use `xdc` as an initiator in your jobspec.)**\
**`URL`**: The URL of your jobs endpoint. ie: `http://localhost:8080/jobs`
This will give you the environment variables you need to run your external initiator. Copy the output. It will look something like this:
```
║ xdc ║ http://localhost:8080/jobs ║ b4846e85727e46b48889c6e28b555696 ║ enNfNhiiCTm1o6l+hGJVfCtRSSuDfZbj1VO4BkZG3E+b96lminE7yQHj2KALMAIk ║ jWt64+Q9benOf5JuGwJtQnbByN9rtHwSlElOVpHVTvGTP5Zb2Guwzy6w3wflwyYt ║ 46m38YkeCymYU0kr4Yg6x3e98CyAu+37y2+kMO2AL9lRMjA3hRA1ejFdG9UfFCAE
```
Create a `startEI.sh` file in the `external-initiator` folder with the following contents:
Be sure to save these values, since the secrets cannot be shown again.
```
export EI_DATABASEURL=postgresql://$USERNAME:$PASSWORD@$SERVER:$PORT/$DATABASE
export EI_CHAINLINKURL=http://localhost:6688
export EI_IC_ACCESSKEY=
export EI_IC_SECRET=
export EI_CI_ACCESSKEY=
export EI_CI_SECRET=
external-initiator "{\"name\":\"xdc\",\"type\":\"xinfin-mainnet\",\"url\":\"https://plirpc.blocksscan.io\"}" --chainlinkurl "http://localhost:6688/"
```
Plugin external-initiator can be started using below command
```
pm2 start startEI.sh
```
# Deployment
Using the Oracle contract, you can use your own node to fulfill requests. This guide will show you how to deploy your own Oracle contract and add jobs to your node so that it can provide data to smart contracts.
### Requirements
Before you begin this guide, complete the following tasks to make sure you have all of the tools that you need:
* Set up XDCPay and obtain Apothem(Testnet) PLI.
* Configure a Xinfin client with an active WebSocket connection.
* Run a Plugin Node and connect it to a supported database.
* Fund the XDC Wallet address that your Plugin node uses. You can find the address in the node Operator GUI under the **Keys** tab. The address of the node is the `Regular` type. You can obtain test ETH from several faucets.
### Address Types
Your node works with several different types of addresses. Each address type has a specific function:
* **Node address:** This is the address for your Plugin node wallet. The node requires native blockchain tokens at all times to respond to requests. For this example, the node uses XDC. When you start a Plugin node, it automatically generates this address. You can find this address on the Node Operator GUI under Keys > Account addresses.
* **Oracle contract address:** This is the address for contracts like `Operator.sol` or `Oracle.sol` that are deployed to a blockchain. Do not fund these addresses with native blockchain tokens such as XDC. When you make API call requests, the funds pass through this contract to interact with your Plugin node. This will be the address that smart contract developers point to when they choose a node for an API call.
* **Admin wallet address:** This is the address that owns your `Operator.sol` or `Oracle.sol` contract addresses. If you're on OCR, this is the wallet address that receives PLI tokens.
### Deploy your own Oracle contract
1. Go to Remix and open the `Oracle.sol` smart contract. The contents of this file will be very minimal.
```
pragma solidity 0.4.24;
import "@goplugin/contracts/src/v0.4/Oracle.sol";
```
1. On the **Compile** tab, click the **Compile** button for `Oracle.sol`. Remix automatically selects the compiler version and language from the `pragma` line unless you select a specific version manually.
2. On the **Deploy and Run** tab, configure the following settings:
* Select "Injected Web3" as your **Environment**. The JavaScript VM environment cannot access your oracle node.
* Select the "Oracle" contract from the **Contract** menu.
* Copy the PLI token contract address for the network(like Mainnet, Apothem as given below) you are using and paste it into the `address_link` field next to the **Deploy** button:
{% tabs %}
{% tab title="Mainnet" %}
xdcff7412ea7c8445c46a8254dfb557ac1e48094391
{% endtab %}
{% tab title="Apothem" %}
xdc33f4212b027e22af7e6ba21fc572843c0d701cd1
{% endtab %}
{% endtabs %}

Compile the program and you should see "green tick"
Click **Deploy**. XDCPay prompts you to confirm the transaction.

If the transaction is successful, a new address displays in the **Deployed Contracts** section. Keep a note of the Oracle contract address(let's remember this address as **OCA** to refer to). You need it later for your contract consumption.
# Fulfillment Request
Find the address for your Plugin node and add it to the Oracle contract.
In the Plugin Operator GUI for your node, find and copy the address at the bottom of the **Keys** page in the Account addresses section.

Copy this address and pass it in the “***setFulfilmentPermission***” method, with the Boolean value “true” like below (without quotes), and click "setFulFillmentPermission" to initiate the transaction
This address basically talks to Oracle contract.

You should see a new transaction is created and successfully
# Job-Setup
**Let’s create a JOB, so you can test and see if your oracle is getting interacted with the external world**
Create an Alarm Job in the Plugin node.
Steps to create Alarm Job -
* Login to the Plugin node
* Navigate to Jobs and click on New Job
* Copy the job specification mentioned below
* Paste the contents into the Json Spec field and create the job
* Copy the newly created job ID which we will be using later
* Submit clientcontract using [xinfin.remix](https://remix.xinfin.network/), if any error occurs then you can use [remix.ethereum](https://remix.ethereum.org/)
**NOTE:**
1\) While filling up "name", and "endpoint" values, please provide the same Name value which you used for 'plugin initiators create \'.
2\) For the 'addresses' values you need to paste the OCA which we used in [Deployment](https://docs.goplugin.co/oracle/deployment). You need to remove the 'xdc' at the start of the OCA and replace it with '0x', and make sure there is no space left at the front or back of the OCA.
```
{
"initiators":[
{
"type":"external",
"params":{
"name": "xdc",
"body": {
"endpoint": "xdc",
"addresses": ["0xf180e56bb575806aefaf2a7616622a9fc180b51c"]
}
}
}
],
"tasks":[
{
"type":"sleep",
"confirmations":null,
"params":{
}
},
{
"type":"ethbool",
"confirmations":null,
"params":{
}
},
{
"type":"ethtx",
"confirmations":null,
"params":{
}
}
],
"startAt":null,
"endAt":null
}
```
Here, “Sleep”, “ethbool”, “ethtx” are core-adapters,
Core adapters are the built-in functionality that every Plugin node supports. Strung together, they act as tasks that need to be performed to complete a Job. Adapters that are prefixed with “Eth” refer to tasks that post data onto the chain.

# Testing
How to test, if my bridge can communicate with plugin and start sharing the data
In your, remix IDE open a new file and name it as PluginClient.sol and copy and paste the code contents.
Override your oracle address & job id in below client contract and deploy it in a remix by overriding the PLI mainnet address like below (Line numbers 21 & 22) in the smart contract to be replaced with your oracle contract address & job-id from the previous steps
```
// SPDX-License-Identifier: MIT
pragma solidity ^0.4.24;
import "https://github.com/GoPlugin/contracts/blob/main/src/v0.4/PluginClient.sol";
import "https://github.com/GoPlugin/contracts/blob/main/src/v0.4/vendor/Ownable.sol";
contract AlarmClockSample is PluginClient, Ownable {
using Plugin for Plugin.Request;
bool public alarmDone;
address private oracle;
bytes32 private jobId;
uint256 private fee;
/**
* Network: Mainnet
* Oracle: Plugin - 0xf180e56bb575806aefaf2a7616622a9fc180b51c
* Job ID: Plugin - bcbac9232272445294102fdd1ee97c98
* Fee: 0.1 PLI
*/
constructor(address _pli) public Ownable() {
setPluginToken(_pli);
oracle = 0xf180e56bb575806aefaf2a7616622a9fc180b51c;
jobId = "982105d690504c5e9ce374d040c08654";
fee = 0.1 * 10 ** 18; // 0.1 PLI
alarmDone = false;
}
/* Create a Plugin request to start an alarm and after the time in seconds is up, return throught the fulfillAlarm function */
function requestAlarmClock(uint256 durationInSeconds) public returns (bytes32 requestId)
{
Plugin.Request memory request = buildPluginRequest(jobId, address(this), this.fulfillAlarm.selector);
// This will return in 90 seconds
request.addUint("until", block.timestamp + durationInSeconds);
return sendPluginRequestTo(oracle, request, fee);
}
/**
* Receive the response in the form of uint256
*/
function fulfillAlarm(bytes32 _requestId, uint256 _volume) public recordPluginFulfillment(_requestId)
{
alarmDone = true;
}
function withdrawPli() public onlyOwner() {
PliTokenInterface pliToken = PliTokenInterface(pluginTokenAddress());
require(pliToken.transfer(msg.sender, pliToken.balanceOf(address(this))), "Unable to transfer");
}
}
```

After deployment, you will receive a contract address- In this case here it is -> **xdc**3017a414bf657a42fc183143e90d378f05ff0004
Fund your contract address with PLI ( let’s say 1 PLI) before you trigger the sleep task like below

Once you submit the “requestAlarm”, a job will be triggered in your PLUGIN Node like below.

After a couple of seconds, you should see the job is getting completed successfully

# Sleep
Tasks are collections of adapters which perform certain tasks
```
"tasks":[
{
"type":"sleep",
"confirmations":null,
"params":{
}
},
{
"type":"ethbool",
"confirmations":null,
"params":{
}
},
{
"type":"ethtx",
"confirmations":null,
"params":{
}
}
],
"startAt":null,
"endAt":null
```
# Get > Bytes32
```
{
"name": "Get > Bytes32",
"initiators": [
{
"type": "runlog",
"params": {
"address": "YOUR_ORACLE_CONTRACT_ADDRESS"
}
}
],
"tasks": [
{
"type": "httpget"
},
{
"type": "jsonparse"
},
{
"type": "ethbytes32"
},
{
"type": "ethtx"
}
]
}
```
# HttpGet
```
{
"initiators": [
{
"type": "RunLog",
"params": { "address": "YOUR_ORACLE_CONTRACT_ADDRESS" }
}
],
"tasks": [
{
"type": "HTTPGet",
"params": { "get": "https://www.example.com/" }
},
{
"type": "JSONParse",
"params": { "path": [ "last" ] }
},
{
"type": "Multiply",
"params": { "times": 100 }
},
{ "type": "EthUint256" },
{ "type": "EthTx" }
],
"startAt": "2021-12-21T10:09:01Z",
"endAt": null,
"minPayment": "1000000000000000000"
}
```
# CRON
```
{
"initiators": [
{
"type": "cron",
"params": { "schedule": "CRON_TZ=UTC * */20 * * * *" }
}
],
"tasks": [
{
"type": "HttpGet",
"params": { "get": "https://example.com/api" }
},
{
"type": "JsonParse",
"params": { "path": [ "data", "price" ] }
},
{
"type": "Multiply",
"params": { "times": 100 }
},
{
"type": "EthUint256"
},
{
"type": "EthTx"
}
]
}
```
# Web
```
{
"initiators": [{"type": "web"}],
"tasks": [
{"type": "multiply", "params": {"times": 100}},
{"type": "custombridge"}
]
}
```
# Introduction
When you want to perform custom computation or custom logic to bring data via specialized APIs, then an External Adapter is the way to go. It helps Plugin to enable an easy way of integrating the custom logic.
It is a service that the Plugin node communicates via its API with a simple JSON specification.
Information on external adapters is broken up into three main categories: contract creators, developers, and node operators.
* Contract Creators will need to know how to specify an external adapter in their request for external data.
* Developers will need to know how to implement an external adapter for an API.
* Node Operators will need to know how to add an external adapter to their node so that they can provide specialized services to smart contracts.
Is it necessary to implement an External Adapter?
* Yes, it is when you want to perform complex logic before the data gets written onto the smart contract.
* For ex - Let's say, you are pulling the data from the "External world" using API, and the data from the API result needs to be formatted
External Initiator defines, when and how a job will run
To set up an external adapter, the node operator need to perform these 3 steps
* Setup Bridge in the Plugin Node
* Update jobspec to have Bridge
* Setup External-Adapter server program in the same node
* Basically, this step decides what kind of services a job is provided to end users. For instance, "Index Pair (BTC/USDT), (ETH/USDT), (ETC/XDC)" etc.,
# Implement External -Adapters
For the demo purpose, we will setup our external adapter to pull the data from weather API. Follow along the following tutorial to understand how it works.
Setting up external initiator requires the following steps to be performed
* Git clone the repository
* cd & npm install
* Include the API endpoint & Parse the payload
* Run the server
Step 1 -
```
git clone https://github.com/GoPlugin/external-adapter-template.git
```
Step 2 -
```
cd weather_adapter
```
Step 3 -
```
npm install
```
Step 4 -
```
map the api endpoint
```
#### Requesting Data
When an external adapter receives a request from the Plugin node, the JSON payload will include the following objects:
* `data` (Guaranteed to be present but may be empty)
* `meta` (Optional, depends on job type)
* `responseURL` (Optional, will be supplied if job supports asynchronous callbacks)
* `id` (Optional, can be nice to use for EA logging to help debug job runs)
Returning Data
When the external adapter wants to return data immediately, it must include `data` in the returned JSON.
An example of the response data can look like this:
```json
{
"data": {
"result": "20.04"
}
}
```
{% hint style="info" %}
Note - The external adapter that you are running, should be the same URL endpoint mapped in Bridge.
{% endhint %}
```
const { Requester } = require('@goplugin/external-adapter')
require("dotenv").config();
const customError = (data) => {
if (data.Response === 'Error') return true
return false
}
const customParams = {
endpoint: ['endpoint']
}
const createRequest = (input, callback) => {
const url = `http:///api/${input.data.endpoint}`
const config = {
url
}
if (process.env.API_KEY) {
config.headers = {
Authorization: process.env.API_KEY
}
}
Requester.request(config, customError)
.then(response => {
if (input.data.envCheck == "WindDirection") {
var resultData = response.data[0]['windDirection'];
} else if (input.data.envCheck == "Temperature") {
var resultData = response.data[0]['tempC'];
} else if (input.data.envCheck == "WindChill") {
var resultData = response.data[0]['windChillC'];
}
response.data.result = resultData.toString();
const res = {
data: {
"result": response.data.result.toString()
}
}
callback(response.status, Requester.success(input.id, res));
})
.catch(error => {
callback(500, Requester.errored(input.id, error))
})
}
module.exports.createRequest = createRequest
```
Let's see what's in "**index**.**js**"
* We are importing 'external-adapter' from goplugin npm using importing methods such as Requester
* Importing "dotenv" module to access the .env file for sensitive info (API\_KEY).
* "customError" is a function to return either true or false if an error occurs.
* "customParams" is a variable to declare parameters to pass on in URL - this can be customized accordingly.
* "createRequest" is the method actually doing the heavy lifting.
* URL is getting defined since for the weather node the endpoint is getting passed via smart contract the "endpoint" is accessed via "input.data.endpoint".
* \ to be replaced with a respective domain name or IP address where we are fetching the data
* api -> router name. Again for our weather node, we have API as rrouter name for your case it can be a different
* config -> variable name to have url parm
* Next, we are checking API*KEY if exists in env parm, else it will not be applied. For authenticated API, you have to pass API*KEY
* Requester.request will scan for the payload from the API endpoint and customize the output .. In this example, we are checking "input.data.envCheck".
* Note that, envCheck is a parameter we are passing via smart contract(Check weather node)
* Based on envCheck, the loop iterates and scans the value from the output payload
* Finally we are constructing the response and return
{% hint style="info" %}
When you run PM2 Start server.js, the server will by default run in port 5001 and just make sure the bridge is correctly pointed out to this port number. For instance, this should be
{% endhint %}
# Define Bridge
Bridges the external adapter to plugin node
You can add external adapters to a Plugin node by creating a bridge in the Node Operators Interface. Each bridge must have a unique name and a URL for the external adapter. If a job has a Bridge Task, the node searches for a bridge by its name and uses that bridge as your external adapter. Remember, Bridge names are case-insensitive.
To create a bridge on the node, go to the **Create Bridge** tab in the Node Operators Interface. Specify a name for the bridge, and the URL for your external adapter, and optionally specify the minimum contract payment and number of confirmations for the bridge.

**Bridge Name** - Must be unique to your plugin node and it is user-defined. For instance, if your external adapter brings your temperature value. Name it as "Temperature" so you can easily refer back to what the bridge does
**Bridge URL** - It should be the URL where the external adapter is running. Mostly try to set this up in your server where the Plugin node is running.
**Minimum Contract Payment** - This is a fee paid in PLI for the Plugin node making a call to the external adapter via the bridge. This fee is in addition to the fee specified at the global node level for processing job requests.
**Confirmation** - Can be kept as 0
***For example -***

Note: If the external adapter is running on the same server as your plugin node. Keeping it as localhost.
# Add Bridge to Job Spec
The bridge is another task, which takes control of the external adapter and performs the defined requirements, and gives back the results to the task services.
For instance, this job spec has a set of tasks
* Temperature
* copy
* multiply
* ethuin256
* EthTx
For most of the job specs, we get the Multiply, ethUin256 & etHTX in place. But the other two (temperate, copy) will be changed from job to job.
In this example, the task is to call the bridge which is Temperature, then the temperature will in turn call the server (which runs external-adapter in endpoint) and bring the results.
The next task, will copy the data from the payload and send it to the next task which is "multiply".
Multiply and then remove the fractions by multiplying with the value given in the contract and the ethuin256 task will convert the results into blockchain understandable format.
Finally, the ethTx task will write the data onto the blockchain.
```
{
"initiators": [{
"type": "external",
"params": {
"name": "xdc",
"body": {
"endpoint": "xdc",
"addresses": ["0x88b1718fa0C01459e0A6a42Ec9AFdB299613d30F"]
}
}
}],
"tasks":
[ {
"type": "Temperature"
},
{
"type": "copy",
"params": {
"copyPath": [
"result"
]
}
},
{
"type": "multiply"
},
{
"type": "ethuint256"
},
{
"type": "EthTx"
}
]
}
```
Similarly, the bridge can perform any task and bring value to the prescribed format.
Implementing an external adapter - custom logic is with the user.
# How to use
The GoPlugin-APIDiscovery platform is specifically designed by our partner TeejLab for the Plugin Community. On this portal, you’ll find important instructions for accessing the platform. After creating/accessing your account on the platform, we encourage you to continue visiting this page in the future for other useful information and announcements related to the platform.
1. Click on the link received in the email Invite and it redirects to portal, navigate to API Categories -> A- Goplugin Recommended APIs to see the list of APIs available for use.
2\. List of available APIs will be displayed.
3\. Click on one of the API (for example Cryptocompare) to get the API endpoint.
4\. Click on the API to get the actual API endpoint URL as below.
5\. Select the “Request Body” tab and click on the Example Request and it will populate the data in the Request Body text box.
6\. Execute the API with input {"fsyms": "BTC", "tsyms": "ETH"} in request body and check for the response in My Results -> API requests.
7\. API key can be fetched from the profile page and this API-KEY can be used for all the APIs listed on the Plugin-TeejLab portal. For the first time Generate a new key and keep it safe for using it in your applications.
8\. You could follow similar steps in the document to create an external adapter and the jobs.
NOTE: API Endpoint URL and API key obtained from the TeejLab portal can be used in the adapter.
# Plugin WFN Use Case
{% hint style="info" %} As we embark on enhancing WFN's capabilities with a data lake upgrade and exploration of new use cases, we have temporarily paused the onboarding of the weather forecast nodes. Please note:- WFN rewards will continue until June 30, 2024, for the current nodes, after which they will be suspended until further notice. \
\ To remain informed about the most recent Plugin advancements, kindly watch out for announcements on Discord.
{% endhint %}
Here are the articles in this section:-
1. Plugin WFN Data Review
2. Plugin WFN Use Case - FAQ
3. Plugin WFN - Ambient Weather Unit
4. Plugin WFN - Acurite Weather Unit
# Plugin WFN Data Review
Plugin offers weather data from Ambient, for the demo purpose the data lake units are being formed from various installation units at the Gulf location. This can be taken widely by setting up similar units across the globe, thus it forms a great data lake.
To execute or set up the weather data "Ambient" & how to contribute - Please wait for our directions.
### Weather Data UI
The weather Data UI points to the link:
### Pre-requisites
You need the following information to test the weather data onto your contract using the Weather Data UI.
* Oracle Address
* Job ID
* API endpoint
* Environment endpoint
### Steps For Using weather Data UI - Mainnet
* Write and deploy your client contract using the network details
* Fund it with **PLI**
* Call your request method with the following input params
* Oracle Address
* **0x1948745008E2704f8784e6654f76458BfF0Cdae5**
* Job ID
* **9ce06be377d846ed9333ef835a342e64**
* API Endpoint
* gettempbyids
* Environment endpoint
* Wind
* Temperature
* RelativeHumidity
* HeatIndex
### Client Contract
```
pragma solidity 0.4.24;
import "@goplugin/contracts/src/v0.4/vendor/Ownable.sol";
import "@goplugin/contracts/src/v0.4/PluginClient.sol";
contract ClientContract is PluginClient, Ownable {
//Initialize Oracle Payment
uint256 constant private ORACLE_PAYMENT = 0.01 * 10**18;
uint256 public Temperature;
uint256 public Humidity;
uint256 public HeatIndex;
uint256 public WindSpeed;
//Initialize event RequestWeatherFulfilled
event RequestWeatherFulfilled(
bytes32 indexed requestId,
uint256 indexed weather
);
//Initialize event requestCreated
event requestCreated(address indexed requester,bytes32 indexed jobId, bytes32 indexed requestId);
//Constructor to pass Pli Token Address during deployment
constructor(address _pli) public Ownable() {
setPluginToken(_pli);
}
//_endCheck should be in these categories(WindDirection,Temperature,WindChill)
//_endpoint should be getlatesttemp
//_jobID should be tagged in Oracle
//_Oracle should be fulfiled with your plugin node address
function requestTemperature(address _oracle, string _jobId,string _endpoint,string _envCheck,string _countryId,string _stateId,string _cityId,string _latlng)
public
returns (bytes32 requestId)
{
Plugin.Request memory req = buildPluginRequest(stringToBytes32(_jobId), this, this.fulfillTemperature.selector);
req.add("endpoint",_endpoint);
req.add("envCheck",_envCheck);
req.add("country",_countryId);
req.add("state",_stateId);
req.add("city",_cityId);
req.add("latlng",_latlng);
req.addInt("times", 100);
requestId = sendPluginRequestTo(_oracle, req, ORACLE_PAYMENT);
emit requestCreated(msg.sender, stringToBytes32(_jobId), requestId);
}
function requestHumidity(address _oracle, string _jobId,string _endpoint,string _envCheck,string _countryId,string _stateId,string _cityId,string _latlng)
public
returns (bytes32 requestId)
{
Plugin.Request memory req = buildPluginRequest(stringToBytes32(_jobId), this, this.fulfillHumidity.selector);
req.add("endpoint",_endpoint);
req.add("envCheck",_envCheck);
req.add("country",_countryId);
req.add("state",_stateId);
req.add("city",_cityId);
req.add("latlng",_latlng);
req.addInt("times", 100);
requestId = sendPluginRequestTo(_oracle, req, ORACLE_PAYMENT);
emit requestCreated(msg.sender, stringToBytes32(_jobId), requestId);
}
function requestWindSpeed(address _oracle, string _jobId,string _endpoint,string _envCheck,string _countryId,string _stateId,string _cityId,string _latlng)
public
returns (bytes32 requestId)
{
Plugin.Request memory req = buildPluginRequest(stringToBytes32(_jobId), this, this.fulfillWindSpeed.selector);
req.add("endpoint",_endpoint);
req.add("envCheck",_envCheck);
req.add("country",_countryId);
req.add("state",_stateId);
req.add("city",_cityId);
req.add("latlng",_latlng);
req.addInt("times", 100);
requestId = sendPluginRequestTo(_oracle, req, ORACLE_PAYMENT);
emit requestCreated(msg.sender, stringToBytes32(_jobId), requestId);
}
function requestHeatIndex(address _oracle, string _jobId,string _endpoint,string _envCheck,string _countryId,string _stateId,string _cityId,string _latlng)
public
returns (bytes32 requestId)
{
Plugin.Request memory req = buildPluginRequest(stringToBytes32(_jobId), this, this.fulfillHeatIndex.selector);
req.add("endpoint",_endpoint);
req.add("envCheck",_envCheck);
req.add("country",_countryId);
req.add("state",_stateId);
req.add("city",_cityId);
req.add("latlng",_latlng);
req.addInt("times", 100);
requestId = sendPluginRequestTo(_oracle, req, ORACLE_PAYMENT);
emit requestCreated(msg.sender, stringToBytes32(_jobId), requestId);
}
//callBack function
function fulfillTemperature(bytes32 _requestId, uint256 _weather)
public
recordPluginFulfillment(_requestId)
{
emit RequestWeatherFulfilled(_requestId, _weather);
Temperature = _weather;
}
//callBack function
function fulfillHeatIndex(bytes32 _requestId, uint256 _weather)
public
recordPluginFulfillment(_requestId)
{
emit RequestWeatherFulfilled(_requestId, _weather);
HeatIndex = _weather;
}
//callBack function
function fulfillWindSpeed(bytes32 _requestId, uint256 _weather)
public
recordPluginFulfillment(_requestId)
{
emit RequestWeatherFulfilled(_requestId, _weather);
WindSpeed = _weather;
}
//callBack function
function fulfillHumidity(bytes32 _requestId, uint256 _weather)
public
recordPluginFulfillment(_requestId)
{
emit RequestWeatherFulfilled(_requestId, _weather);
Humidity = _weather;
}
function getPluginToken() public view returns (address) {
return pluginTokenAddress();
}
//With draw pli can be invoked only by owner
function withdrawPli() public onlyOwner {
PliTokenInterface pli = PliTokenInterface(pluginTokenAddress());
require(pli.transfer(msg.sender, pli.balanceOf(address(this))), "Unable to transfer");
}
//Cancel the existing request
function cancelRequest(
bytes32 _requestId,
uint256 _payment,
bytes4 _callbackFunctionId,
uint256 _expiration
)
public
onlyOwner
{
cancelPluginRequest(_requestId, _payment, _callbackFunctionId, _expiration);
}
//String to bytes to convert jobid to bytest32
function stringToBytes32(string memory source) private pure returns (bytes32 result) {
bytes memory tempEmptyStringTest = bytes(source);
if (tempEmptyStringTest.length == 0) {
return 0x0;
}
assembly {
result := mload(add(source, 32))
}
}
}
```
Deploy the above ClientContract using . Once the contract is deployed, it has to be funded(0.2 PLI). For the sake of convenience, we can call the address of this contract **CC** for now.
{% hint style="info" %}
After deployment, you should fund your client contract with PLI(0.2 PLI)
{% endhint %}
After the contract is funded it has to be flattened using remix, for the convenience of the user the flattened form of the ClientContract is provided below.
Now you can go to the weather Data UI - [link](https://wfn.goplugin.co/)
{% file src="/files/kna7UGCADdXlH6rWLWi3" %}
#### WEATHER INFO
Select the filtering criteria like 'City', 'State', and 'Country' and click 'Show', you will be getting the latest weather info of the place you selected. After getting the result, move to the 'BLOCKCHAIN INFO' tab.
#### BLOCKCHAIN INFO
#### Deploy your contract tab details:
1\) Select the 'Deploy your contract' tab and paste the flattened form of the contract and make sure you have selected the 'Mainnet' selection button and not 'Apothem', then press compile, after successful compilation you should get the ABI as the resultant.
2\) Make sure you have XDC wallet installed and the account is pointing to 'mainnet', now click on the Deploy button. Now you should have got 'View Transaction' at the bottom, right-click on that and verify whether the transaction succeeded.
3\) Copy and paste the 'ABI' contents from this page to a notepad.
#### Push Weather tab details:
1\) Paste the copied ABI into the ABI field, client contract address (which is mentioned above as CC) into the 'Contract Address' field, oracle address, and job id to the respective fields.
2\) Select an 'Environmental check' and click on Submit.
3\) Once the transaction is done successfully you will get the 'View Transaction' button, click on it and verify the transaction status as 'success'. On the same page you can find the 'To:' field, copy the address in this field, and fund the address with 0.1 PLI
#### Show Weather tab details:
1\) Paste the address which you copied and fund the same in 'Weather tab details' into 'Request Contract' field. Make sure you replaced the 'xdc' to '0x' at the start of the address.
2\) Paste the ABI content into the 'ABI' field, select the 'Environmental check' field which you pushed and click submit, you will be receiving the weather details whatever you just pushed onto the plugin blockchain.
#### 10 DAYS RECORD
In this tab the user can witness the 10 days of data for the selected location. Currently, the weather details include Temperature, Wind, Humidity and, HeatIndex.
# Plugin WFN Use Case - FAQ
This page provides the FAQ pertaining to the weather node. We will constantly update the FAQ based on our community interaction.
### FAQ:
1. **When can I unstake my WFN Node?**
As mentioned, rewards for the WFN Node will be sent until the 30th of June 2024. You'll be able to unstake and withdraw your tokens to your wallet by the end of June.
2. **Can we onboard our nodes at this moment?**
We have temporarily paused the onboarding of the weather forecast nodes.
3. **If I face issues while withdrawing WFN Staked tokens, how can I reach out to the team?**
The team is always available on Discord, and we actively monitor the WFN group. Additionally, you can raise a ticket to the team.
4. **Can't see the unstake button on the WFN Platform?**
It will be available by the end of June 2024, on the WFN Platform [“https://wfn.goplugin.co/](https://wfn.goplugin.co/)”
5. **Can I use a different wallet to unstake and withdraw my WFN Node?**
During withdrawal, operators should use the wallet address that was used while registering WFN into our platform.
6. **What happens if I miss the deadline to unstake my WFN Node?**
We would recommend keeping a tab on the WFN platform and trying to unstake at the earliest. We would keep sending a couple of reminders to WFN Operators to complete this transition smoothly.
7. **Will there be any penalties for unstaking my WFN Node early?**
Certainly not, there are no penalties for unstaking your node early, but if you withdraw tokens before the rewards due date, you’ll lose the rewards. So please be mindful when making the withdrawal.
8. **Can I restake my WFN Staked tokens after unstaking them?**
You will be notified when the WFN platform is resuming its operation.
9. **How long does it take for unstaked WFN tokens to be available in my wallet?**
It may vary depending on network congestion and other factors. Typically, it can take a few seconds to minutes.
10. **Is there a minimum amount of tokens required to unstake for a weather forecast node (WFN)?**
No, when you un-stake, the entire tokens staked will be returned to your wallet.
11. **Can I delegate my WFN unstaking process to someone else?**
No, only the concerned node operators should be able to perform this unstaking process. No delegation is allowed.
12. **Will I still receive rewards for the period between unstaking and withdrawing from the WFN Node?**
No, you’ll not receive rewards once the node is unlocked.
13. **Can I track the status of my WFN unstaking request?**
Yes, you can track the status of your unstaking request through the WFN dashboard.
14. **Which Weather Unit model should I buy to participate as a data provider?**\
Members can purchase an Ambient weather unit model as mentioned below. (Note:- Nodes onboarding is currently paused) Members who had purchased the Acurite weather unit can continue contributing the weather data. We started supporting the Ambient weather unit now due to their global support. Members are advised to contact Ambient for their support in your local region.
**Ambient Weather Unit**

Model: [Ambient Weather Smart Weather Station with WiFi Remote Monitoring and Alerts and 24" Mounting Pole – Plugin, decentralized network built on XDC ](https://ambientweather.com/2902d-plugin?NKAC=uSaxDa4NBJ\&referring_service=link)
15. **Where can I purchase the Weather unit?**
Users can buy the sensor from the below-mentioned link.\
Ambient link:
16. **How to install the Weather unit?**
Please follow the steps provided in the product manual.
17. **How to register the weather unit on the Plugin Platform?**
Follow the document at . (Note:- Nodes onboarding is currently paused)
18. **How much staking is needed for a weather unit to participate as a Data Provider?**
1000 PLI & 5000 XDC should be staked to participate as data providers.
19. What are the points or cautions to be taken care while staking for WFN?
Please adhere to the following for successful staking.
1. Before you click the "Stake Now" button, make sure you have sufficient balance in your wallet(XDC & PLI).
2. Do not navigate out of your browser or close your window, after you initiate the Staking Txn. We will not be able to capture your transaction & you will lose your assets and we cannot trace them back.
3. Please wait for the transaction dialog box to trigger from your XDCPay and "Accept" the same.
4. Two alerts will trigger to the stake, one for PLI(1000) and another for XDC(5000). Please be patient and allow the XDCPay to open the Txn Dialog box.
5. **What is the duration for weather unit staking?**
This staking is for one year.
21. **How much I will be rewarded for setting up this weather unit?**
**The First 100 users**, will get 7% of staked PLI & 7% of staked XDC as reward benefits for maintaining the weather unit & keeping it up & running 24/7.
22. **How many weather stations can a member deploy?**
Community members can deploy multiple weather stations like one at home, office or shop, etc., subject to a minimum distance between 2 such sensors is at least 2 km.
23. **What are the basic criteria needed to participate in a weather use case as a data provider?**
One should have uninterruptible power and wifi access. An outdoor place to install the weather station outdoor unit, so that the weather station should be freely exposed to all weather environments without any interruption.
24. **Do I need to set up a plugin node to register my weather unit?**
Not really, you have the option to set up a weather unit and be a data provider. It is not mandatory to host a plugin node to be a data feed provider.
25. **I have already installed the weather unit, as a beta user. Should I participate in staking?**
Yes, it is necessary to be a part of the staking program to receive the reward benefits.
26. **Is Staking enabled for the Weather unit?**
Yes, Staking is enabled and for staking for WFN, you need to have 5000 XDC and 1000 PLI tokens in your wallet.
27. **What are the details I need, to register the weather unit in the plugin platform?**
You should share your device ID, and your location coordinates (city, state, country, latitude, and longitude). You should abide Plugin Privacy policy for sharing your coordinate details.
28. **What should I do if my weather unit is not working or switched off for any issues?**
In such a situation, please raise a Ticket intimating your weather unit status to the Plugin team. So that we can stop collecting your weather details. Please ensure to get back your weather unit in working mode to avail the reward benefits.
29. **What if want to withdraw my stake, well within 1 year of the staking period?**
We strongly recommend the data feed providers keep the machine running for 1 year to avail of the reward benefits. During the unavoidable situation, if you happen to relocate, then please ensure the weather unit is re-setup in a new location & share the inputs with us. At any cost, "Un-staking" will not be entertained for 1 year.
30. **Will I get reward benefits even after the staking period?**
Yes, as long as we receive the data from your weather unit. You will be rewarded.
31. **I am not on the "First 100" list, can I participate in this "weather unit" staking program?**
Yes, Plugin welcomes data feed providers.
32. What is the maximum cap for the number of weather stations for Plugin WFN products?
We are looking forward to deploying 1 Million weather units across the globe.
33. How many weather units can a member install?
Currently we are allowing 1 weather node per member, but we have plans to accommodate more weather units per member.
34. **Rewards Penalty Percentage based on downtime for Weather Forecast Node Operator.**
* WFN Node Inactivity for 1 to 2 days: No penalties will be incurred.
* WFN Node Inactivity for 3 to 7 days: A penalty of 25% will be applied.
* WFN Node Inactivity for 8 to 14 days: A penalty of 50% will be applied.
* WFN Node Inactivity for 15 to 21 days: A penalty of 75% will be applied.
* WFN Node Inactivity for 22 to 31 days: A penalty of 100% will be applied.
# Plugin WFN - Ambient Weather Unit Onboarding Instructions
{% hint style="info" %} As we embark on enhancing WFN's capabilities with a data lake upgrade and exploration of new use cases, we have temporarily paused the onboarding of the weather forecast nodes.
{% endhint %}
For Purchase of Ambient weather unit model, please go through the points (1) & (2) in [Plugin WFN Use Case - FAQ](https://docs.goplugin.co/use-cases/plugin-wfn-use-case/plugin-wfn-use-case-faq) & place your order by clicking this [link](https://ambientweather.com/2902d-plugin?NKAC=uSaxDa4NBJ\&referring_service=link) .
On this page, members will be guided to register in ambientweather.net and get the 'applicationkey' & 'apikey' to register your device on Plugin portal.
Members should follow the 'User Manual' provided with the device to connect the device with Wi-Fi and other installation steps. While setting up, please make a note of MAC address, which is used to register in step (III).
### I) Register in Ambientweather
* Signup in [**https://ambientweather.net**](https://ambientweather.net)
### II) **Click on Devices Menu and click on Connect a New Device button**
### III) **Enter the MAC address captured while setting up the device on Ip address 192.168.4.1**
### IV) Click Next, in the following screen Enter the Device name, Select the Device location and Click on Create
### V) **Once successfully added you will be able to view your Device on the homepage**
### VI) Click on the user icon as given in the image
### VII) **Create API key**

### VIII) **Create Application Key**

**NOTE**: Keep the API key and Application key generated in the above steps safe. This will be used in Step IX) for connectivity testing and the same will be used for registering your Device on the Plugin platform.
### IX) Testing Ambient Device for Data connectivity
Once you created the apiKey & application key for your device, you can check the data transmission from your device to the ambientweather.net portal by following the below-mentioned steps.
* Login to
* Click on the "List Users Device as highlighted in the image
* Now click on the "Try" button and enter your apiKey & application key in the respective fields
* Click on Call Resource and check the response. Once you get a successful response with weather data as given below, then you can register your device on the Plugin portal
### X) **Registering Ambient weather unit on Plugin Platform**
* Go to ‘’ click on ‘Tag My device’ and click on the ‘Add New’ button.

* In the ‘Add New Device Tag’ page provide all the details which you collected including applicationkey, apikey, latitude, longitude, country, state, city, zip code, wallet address etc., and submit for approval.

* Team Plugin will validate and verify your node details, if the data provided by the user fails then it will be sent back to the user with ‘Return for Clarification’ with appropriate comments, so the user can rectify the issue and send it back for Approval.
### XI) Staking for Weather node
* Once the node is moved to the 'Approved' state, the user needs to stake 1000 PLI & 5000 XDC to register as a data provider for the weather use case.
* To stake for Plugin WFN unit user needs to click on the 'WFN Stake' link provided on the menu.
* You can see the 'Stake now' button on the 'WFN Stake' page, When you click the button it takes you to the 'Add New Weather Stake' page. **In place of 'No Approved Weather nodes Found.' you will get your Approved WFN device ID**. Select the Device ID and please read through the 4 points mentioned on the page for successful staking.

* Now, click on the 'Sign' button to validate your wallet account address. After signing in you will get a button to 'Stake PLI'. Click on the 'Stake PLI' button and allow the transaction to complete successfully. Then the 'Stake XDC' button will get enabled and you can stake XDC successfully.\
\
**IMPORTANT**: Please don't move out of the page or close the page while the transaction is taking place.
* After staking is done successfully the node details will be pushed into our 'Data collector engine' and your contribution to the weather use case starts.
# Plugin WFN - Acurite Weather Unit Onboarding Instructions - LEGACY
We are currently supporting Ambient weather Unit, existing Acurite weather unit in WFN data transmission is accepted. Furthermore, there will not be any Approval on any new Acurite weather unit for Plugin WFN. Members are requested to purchase Ambient weather unit.
**Plugin WFN - Acurite Weather Unit Onboarding Instructions**
On this page you will be guided to fetch the information from your sensor and register with Plugin.
#### Collecting information from your Acurite Dashboard:
To collect Device Id, Latitude, and Longitude. Go to myAcurite Dashboard of your sensor and click on 'Settings'.
When you click 'Settings' you will get a drop down, in which ‘Account Profile’ is displayed as an option. Click on ‘Account Profile’ which will take you to your ‘Account Profile’ page.

Next to the ‘Account Profile’ tab you can find the ‘Devices’ tab, click on the ‘Devices’ tab wherein you can find the information of your Device id, Latitude, and Longitude.

Copy this info and store it in a file. In the device ID remove the intermittent ‘:’ and keep it handy.
If you are able to register your sensor with your latitude/longitude with the myAcurite portal then you can consider that as the correct one. For people who purchased myAcurite in a different region wherein, myAcurite did not allow you to register with your country/state/city latitude/longitude then you can get your latitude/longitude information through ‘google maps’ and locate your exact location using maps and right-click to get the lat & long info and keep it handy.
#### Registering the sensors on the Plugin Platform:
Go to ‘[http://oracles.goplugin.co](http://oracles.goplugin.co/)’ click on the ‘Tag My device’ and click on the ‘Add New’ button.


In the ‘Add New Device Tag’ page provides all the details which you collected and press submit.

Team Plugin will validate and verify your node details, if the data provided by the user fails then it will be sent back to the user with ‘Return for Clarification’ with appropriate comments, so the user can rectify the issue and send it back for Approval.
#### Staking for Weather node:
Once the node is moved to the 'Approved' state, the user needs to stake 1000 PLI & 5000 XDC to register as a data provider for the weather use case.
To stake for Plugin WFN unit user needs to click on the 'WFN Stake' link provided on the menu.

You can see the 'Stake now' button on the 'WFN Stake' page, When you click the button it takes you to the 'Add New Weather Stake' page. **In place of 'No Approved Weather nodes found'. You will get your Approved WFN device ID**. Select the Device ID and please read through the 4 points mentioned on the page for successful staking.

Now, click on the 'Sign' button to validate your wallet account address. After signing in you will get the button to 'Stake PLI'. Click on the 'Stake PLI' button and allow the transaction to complete successfully. Then the 'Stake XDC' button will get enabled and you can stake XDC successfully.
**IMPORTANT**: Please don't move out of the page or close the page while the transaction is taking place. After staking is done successfully the node details will be pushed into our 'Data collector engine' and your contribution to the weather use case starts.
# Unlock WFN Node
Here are the steps to unlock your WFN Node.
1. Please log into the Oracle platform and go onto "WFN Stake".
2. Click on View which is given alongside your node details, and follow the upcoming steps.
3. **Step to unlock XDC Tokens** - Click on "Withdraw XDC", shown in the image.
4\. Type "yes" & click confirm as shown in the image
5. The transaction hash of the withdrawn XDC tokens can be seen as highlighted in the image.
6. **Step to unlock PLI Tokens** - Click on "Withdraw PLI", shown in the image.
7. Type "yes" & click confirm as shown in the image
8. You'll now be able to see the withdrawn tokens transaction hash of both PLI & XDC, and your wallet will now have the withdrawn tokens.
8. This changes your node status to "withdrawn".
We thank you for your support all along. Please keep supporting us as we look forward to amazing opportunities ahead and continue striving forward.
# Crypto Compare - Pricing Index
{% hint style="info" %}
[**CryptoCompare**](https://www.cryptocompare.com/about-us/) is a global cryptocurrency market data provider, giving institutional and retail investors access to real-time, high-quality, reliable market and pricing data on 5,300+ coins and 240,000+ currency pairs. By aggregating and analyzing this data from globally recognized exchanges, and seamlessly integrating different datasets in the cryptocurrency price, CryptoCompare provides a comprehensive, holistic overview of the market
{% endhint %}
Peer to Peer payment system, DEFI applications mostly deal with currency pair value. It is important to understand, how it works before you offer the services to end users.
As a node operator/data feed provider, you should be able to set up a crypto-compare adapter which can bring the currency pair value to end customers easily. All it takes, sign-up, generate API key and setup adapter
{% hint style="info" %}
Before you continue to read the article, please ensure you have "Running" plugin node, initiators.
{% endhint %}
Sign-up in Crypto-compare and get your API-Key. Choose FREE PLAN and it is most sufficient as they are offering 100,000 hits/month
### **Step1 - Deploy Oracle**
#### *Steps to be accomplished:*
1\) Go to Remix and open the `Oracle.sol` smart contract. The contents of this file will be very minimal. pragma solidity 0.4.24;
```
pragma solidity 0.4.24;
import "@goplugin/contracts/src/v0.4/Oracle.sol";
```
2\) On the **Compile** tab, click the **Compile** button for `Oracle.sol`. Remix automatically selects the compiler version and language from the `pragma` line unless you select a specific version manually.
3\) On the **Deploy and Run** tab, configure the following settings:
* Select "Injected Web3" as your **Environment**. The JavaScript VM environment cannot access your oracle node.
* Select the "Oracle" contract from the **Contract** menu.
* Copy the PLI token contract address for the network(like Mainnet, Apothem as given below) you are using and paste it into the `address_link` field next to the **Deploy** button:
{% tabs %}
{% tab title="Mainnet" %}
0xff7412ea7c8445c46a8254dfb557ac1e48094391
{% endtab %}
{% tab title="Appothem" %}
0x33f4212b027e22af7e6ba21fc572843c0d701cd1
{% endtab %}
{% endtabs %}

Compile the program and you should see "green tick"
Click **Deploy**. XDCPay prompts you to confirm the transaction.

If the transaction is successful, a new address displays in the **Deployed Contracts** section. Keep a note of the Oracle contract address (let's remember this address as **OCA** to refer). You need it later for your contract consumption.
### **Step2 - Fulfilment node address**
#### Steps to be accomplished:
Find the address for your Plugin node and add it to the Oracle contract.
1\) In the Plugin Operator GUI for your node, find and copy the address at the bottom of the **Keys** page in the Account addresses section.

Copy this address and pass it in “***setFulfilmentPermission***” method, with Boolean value “true” like below (without quotes) and click "setFulFillmentPermission" to initiate the transaction
This address basically talks to Oracle contract.

You should see a new transaction is created and successful.
### **Step3 - Create External-Adapter Bridge**
For the demo purpose, we will setup our external adapter to pull the data from cryptocompare API. Follow along this tutorial to understand how this works
Setting up external initiator requires following steps to be performed
* Git clone the repository
* cd & npm install
* Include the API endpoint & Parse the payload
* Run the server
#### Steps to be accomplished:
Step 1 -
```
git clone https://github.com/GoPlugin/external-adapter-template.git
```
Step 2 -
```
cd external-adapter-template/cryptocompare_adapter
```
Step 3 -
```
npm install
```
Step 4 -
```
map the api endpoint
```
#### Description:
#### Requesting Data
When an external adapter receives a request from the Plugin node, the JSON payload will include the following objects:
* `data` (Guaranteed to be present but may be empty)
* `meta` (Optional, depends on job type)
* `responseURL` (Optional, will be supplied if job supports asynchronous callbacks)
* `id` (Optional, can be nice to use for EA logging to help debug job runs)
**Returning Data**
When the external adapter wants to return data immediately, it must include `data` in the returned JSON.
An example of the response data can look like:
```
{
data: {
result: '0.07261'
}
}
```
{% hint style="info" %}
Note - the external adapter that you are running, should be the same URL endpoint mapped in Bridge.
{% endhint %}
```
const { Requester, Validator } = require('@goplugin/external-adapter')
require("dotenv").config();
const customError = (data) => {
if (data.Response === 'Error') return true
return false
}
const customParams = {
endpoint: ['endpoint']
}
const createRequest = (input, callback) => {
const url = `https://min-api.cryptocompare.com/data/pricemulti?fsyms=${input.data.fromsystem}&tsyms=${input.data.tosystem}`
const config = {
url
}
if (process.env.API_KEY) {
config.headers = {
"api_key": process.env.API_KEY
}
}
Requester.request(config, customError)
.then(response => {
//console.log("response value is ",response.data[input.data.fromsystem][input.data.tosystem]);
const res = {
data: {
"result": response.data[input.data.fromsystem][input.data.tosystem].toString()
}
}
callback(response.status, Requester.success(input.id, res));
})
.catch(error => {
callback(500, Requester.errored(input.id, error))
})
}
module.exports.createRequest = createRequest
```
Let's see what's in "**index**.**js**"
* We are importing 'external-adapter' from goplugin npm repo and importing two methods such as Requester, Validator.
* Importing "dotenv" module to access the .env file for sensitive info (API\_KEY)
* "customError" is a function to return either true or false if error occurs
* "customParams" is a variable to declare custom parameters to pass on in URL - this can be customized accordingly
* "createRequest" is the method actually doing heavy lifting.
* URL is getting defined, since for cryptocompare node the endpoint is getting passed via smart contract the source & destination token is accessed via "input.data.fromsystem","input.data.tosystem"
* Next, we are checking API*KEY if exists in .env parm, else it will not be applied.. For authenticated API, you have to pass API*KEY
* Requester.request will scan for the payload from API endpoint and customized the output. In this example, we are checking "input.data.fromsystem","input.data.tosystem"
{% hint style="info" %}
When you run PM2 start server.js, the server will by default run in port 5002 and just make sure the bridge is correctly pointed out to this port number.. For instance, this should be
{% endhint %}
**Define Bridge**
You can add external adapters to a Plugin node by creating a bridge in the Node Operators Interface. Each bridge must have a unique name and a URL for the external adapter. If a job has a Bridge Task, the node searches for a bridge by name and uses that bridge as your external adapter. Bridge names are case insensitive.
To create a bridge on the node, go to the **Create Bridge** tab in the Node Operators Interface. Specify a name for the bridge, the URL for your external adapter, and optionally specify the minimum contract payment and number of confirmations for the bridge.
**Bridge Name** - Must be unique to your plugin node and it is user defined. For instance, if your external-adapter brings your temperature value. Name it as "Temperature" so you can easily refer back what does the bridge does
**Bridge URL** - It should be the URL where the external-adapter is running. Mostly try to set this up in your server where plugin node is running.
**Minimum Contract Payment** - Is a fee paid in PLI for the Plugin node making a call to the external adapter via the bridge. This fee is in addition to the fee specified at the global node level for processing job requests.
**Confirmation** - Can be kept as 0.
{% hint style="info" %}
Note : If external-adapter is running in same server as your plugin node. Keeping the 'Bridge URL' as ''.
{% endhint %}
### Step4 - CryptoCompare login & API generation
You need API key from crypto compare site to interact with the API of cryptocompare site. To get your own customized API key follow the steps mentioned below.
#### Steps to be accomplished:
1. Go to
2. Click on 'Log In/Sign Up' at the top right corner.
3. You will get a Single sign on page as mentioned below, you can sign in using your Gmail id or Facebook id. Click on the 'SIGNUP' button to get registered with your Gmail/Facebook ID.

4\. Once you signed up, check your mailbox for the activation link and click on the activation link.
5\. After activating your account with cryptocompare go to the 'home' page and click on the 'API Keys' in the drop down under your profile.

6\. Now click on the 'Create an API Key' button

7\. Give a suitable name related to the task, click on the option as mentioned in the image below and press button 'Add'.

8\. Select the 'other' option from the dropdown and hit 'Save' button.

9\. Now your API key is generated, copy the API key and store the key in '.env' file as *API\_KEY=\ under cryptocompare\_adapter folder*
10\. Run 'node server.js' inside cryptocompare\_adapter folder
### **Step5 - Create a Job**
**Add Bridge to Job Spec**
Bridge is an another task, which takes the control to external-adapter and perform the defined requirements and give back the results to the task services..
For instance, this job spec has set of task
* cryptocompare(This is the name of your bridge which you set up)
* copy
* multiply
* ethuin256
* EthTx
For most of the job spec's, we ge the Multiply, ethUin256 & etHTX in place. But the other two(cryptocompare, copy) will be changed job to job.
in this example, the task is to call the bridge which is cryptocompare, then cryptocompare will in turn call the server(which runs exernal-adapter in endpoint) and bring the results.
Next task, will copy the data from the payload and send it to next task which is "multiply".
Multiply then remove the fractions by multiplying with the value given in the contract and ethuin256 task will convert the results into blockchain understandable format.
Finally, ethTx task will write the data onto blockchain.
{% hint style="info" %}
NOTE: Change oracle\_address in below mentioned JSON to your Orace address generated as the result of executing Oracle.sol in the beginning.
{% endhint %}
```
{
"initiators": [{
"type": "external",
"params": {
"name": "xdc",
"body": {
"endpoint": "xinfin-mainnet",
"addresses": ["oracle_address"]
}
}
}],
"tasks":
[ {
"type": "cryptocompare"
},
{
"type": "copy",
"params": {
"copyPath": [
"result"
]
}
},
{
"type": "multiply"
},
{
"type": "ethuint256"
},
{
"type": "EthTx"
}
]
}
```
Similarly, bridge can perform any tasks and bring the value to prescribed format. Implementing the external-adapter - custom logic is with user.
### **Step6 - Run consumer.sol**
Copy the below mentioned contract, below-mentioned in remix and paste the contents.
#### *Consumer.sol*
```
pragma solidity 0.4.24;
import "@goplugin/contracts/src/v0.4/vendor/Ownable.sol";
import "@goplugin/contracts/src/v0.4/PluginClient.sol";
contract Consumer is PluginClient, Ownable {
//Initialize Oracle Payment
uint256 constant private ORACLE_PAYMENT = 0.1 * 10**18;
uint256 public currentValue;
//Initialize event RequestFulfilled
event RequestFulfilled(
bytes32 indexed requestId,
uint256 indexed currentVal
);
//Initialize event requestCreated
event requestCreated(address indexed requester,bytes32 indexed jobId, bytes32 indexed requestId);
//Constructor to pass Pli Token Address during deployment
constructor(address _pli) public Ownable() {
setPluginToken(_pli);
}
//_fsysm should be the name of your source token from which you want the comparison
//_tsysm should be the name of your destinaiton token to which you need the comparison
//_jobID should be tagged in Oracle
//_oracle should be fulfiled with your plugin node address
function requestData(address _oracle, string _jobId,string _fsysm,string _tsysm)
public
onlyOwner
returns (bytes32 requestId)
{
Plugin.Request memory req = buildPluginRequest(stringToBytes32(_jobId), this, this.fulfill.selector);
req.add("fromsystem",_fsysm);
req.add("tosystem",_tsysm);
req.addInt("times", 100);
requestId = sendPluginRequestTo(_oracle, req, ORACLE_PAYMENT);
emit requestCreated(msg.sender, stringToBytes32(_jobId), requestId);
}
//callBack function
function fulfill(bytes32 _requestId, uint256 _currentval)
public
recordPluginFulfillment(_requestId)
{
emit RequestFulfilled(_requestId, _currentval);
currentValue = _currentval;
}
function getPluginToken() public view returns (address) {
return pluginTokenAddress();
}
//With draw pli can be invoked only by owner
function withdrawPli() public onlyOwner {
PliTokenInterface pli = PliTokenInterface(pluginTokenAddress());
require(pli.transfer(msg.sender, pli.balanceOf(address(this))), "Unable to transfer");
}
//Cancel the existing request
function cancelRequest(
bytes32 _requestId,
uint256 _payment,
bytes4 _callbackFunctionId,
uint256 _expiration
)
public
onlyOwner
{
cancelPluginRequest(_requestId, _payment, _callbackFunctionId, _expiration);
}
//String to bytes to convert jobid to bytest32
function stringToBytes32(string memory source) private pure returns (bytes32 result) {
bytes memory tempEmptyStringTest = bytes(source);
if (tempEmptyStringTest.length == 0) {
return 0x0;
}
assembly {
result := mload(add(source, 32))
}
}
}
```
{% hint style="info" %}
NOTE: For Demo purposes, we used ETH, and BTC as the source and destination tokens. Node operators are requested to give different and unique token pairs so that we can have many different varieties of pairs to be processed in our platforms, thereby we can get more job requests spanning across different token pairs.
{% endhint %}
### Steps to fetch the comparison detail from cryptocompare API
#### Steps to be accomplished:
1. In the compiler, choose the 0.4.24 version for the compiler option and compile, once the contract is compiled successfully you should deploy the contract.
2\. While deploying select the 'ENVIRONMENT' as 'Injected Web3', select 'Consumer - contracts/Consumer.sol', paste '0xff7412ea7c8445c46a8254dfb557ac1e48094391' next to Deploy button and click on Deploy button.
3\. After successful deployment copy the contract address of the deployment and paste it in 'At Address' and click on 'At Addressthe ' button.
4\. Now copy the consumer contract address and fund the address with 0.1 PLI.
5\. Once the funding is completed form a string with the respective details you stored "oracle\_*address", "job\_spec\_id", "SRC\_Token". "DEST\_Token" (eg:* "0xaa9F8EF6e0dcf6C3F503075F38f13D10a8C5b1E9","a6c6ae51-4950-40a0-94ba-e52365e71ce1","ETH","BTC"*) then click on requestData.*
*6. After the transaction is done successfully, you can check it up by clicking 'currentValue' you can get the conversion value between your source and destination token.*
# How to Register / Sign-up
Step 1 - Sign-up using
Step 2 - Sign-up by feeding all the necessary inputs

Step 3 - You get "verification link" in your email inbox
Step 4 - Click the verification link

Step 5 - Keep the credentials very safe
# How to enable 2FA
Step 1 - Login onto using your credential
Step 2 - Go to "Settings"
Step 3 - Go to the "Secure your account" section & "Enable"

Step 4 -

Step 5 - Install Google Authenticator App
[Android](https://play.google.com/store/apps/details?id=com.google.android.apps.authenticator2)
[iOS](https://apps.apple.com/us/app/google-authenticator/id388497605)
Step 6 - Scan the "QR" code from Step 4 and enter the authentication code displayed then "Submit"
You will see a "2FA enabled" notification
{% hint style="info" %}
Note - Next time when you log in. The platform will ask you to enter OTP & 2FA authentication codes to authenticate yourself. If you miss your mobile or accidentally remove the authenticator app. You have to submit a separate email request from your registered email ID to request for "Reset" 2FA
{% endhint %}
# How to update profile
Step 1 - Login onto using your credential
Step 2 - Go to "Settings"
Step 3 - Click "Edit Profile"
Change your profile information & "Save Changes"
# How to add XDC Wallet Address
Step 1 - Login onto using your credential
Step 2 - Go to "My Wallet" section
Step 3 - Click "Add Wallet"
Step 4 - Add your xdc wallet address and set it as "Default"
Step 5 - "Save Changes"

# How to Navigate Dashboards
Step 1 - Login onto using your credential

{% tabs %}
{% tab title="Active Nodes" %}
It is number of nodes you have submitted for review & approved by admin
{% endtab %}
{% tab title="Incentives" %}
Monthly incentives which gets deposited into user XDC wallet
{% endtab %}
{% tab title="Reputation" %}
On a scale of 1-5, the reputation gets displayed to user. Lower the value, lesser the reward %
{% endtab %}
{% tab title="Penalties" %}
Penalties shows the number of PLI to deduct from the monthly incentives. It directly co-relates with reputation
{% endtab %}
{% endtabs %}
{% tabs %}
{% tab title="Total PLI Balance" %}
Total PLI balance from user waller address from XDCPay
{% endtab %}
{% tab title="Bounty Rewards" %}
If bounty user, it has number of PLI to be available for user (Virtual amount)
{% endtab %}
{% tab title="Staked by User" %}
During node setup, user has to stake PLI and this shows the amount of PLI staked by User
{% endtab %}
{% tab title="Staked by Plugin" %}
For bounty winners, this amount gets staked by Plugin Team. To avail this, user has to first stake and plugin team will stake for the respective node.
{% endtab %}
{% endtabs %}
### Login Sessions
* It has the login activity details by the users
### Node Details
* It has node details submitted by the users
# How to submit Node Details
Step 1 - Login onto using your credential
Once your node is ready with the following, you should be able to submit the details to Plugin Team to review & approve the same.
* Node Address
* Oracle Contract address
* Job ID
{% hint style="info" %}
Note, a node can have multiple job setup. Basically, job allows the end user to consume the tasks. More the jobs you setup and share with community, higher the chance to get the PLI fee
{% endhint %}

Click - My Nodes -> Add Node & provide the following inputs
Following fields are required to add
* Name - Name of your node (It is user defined) - Recommendation ( Region of your server) For instance - Ohio-Server1
* Short Description - This will be displayed and visible to the public, so keep it descriptive enough so user can understand about your nodes
* Provider - Aws or Google or Azure or Vultr or other service providers - you can name it
* IP Address of the machine - Note this will not be visible to public users -- Only for admin review
* Operating System
* RAM - 4GB, 8GB, etc
* Security Patch Version - Current Version of OS & respective security patch details
* Oracle Address - "Smart Contract" which you deployed during node setup
* Node Address - "Plugin Node Address" - Regular account
* Wallet Address - XDC Wallet address
* Key input. PLEASE DO NOT PROVIDE D'CENT Wallet address here. Since, after your node is approved, you are expected to do "Staking".. Only XDCPay wallet works for staking at this point.
* Network - Mainnet or Apothem (Mostly it should be Mainnet) for public use
Once you submit the node details, it will notify the "Plugin Team" for review & approval. So expect a little delay for review & approval, as the requests queue will be high.
{% hint style="info" %}
It is very important to give correct information, or else the node will not be approved. So take time to review before you submit. If there is not enough data, your request will be "returned for modification" - which you can view in "My Nodes"
{% endhint %}
# How to stake PLI token for Plugin Node
Step 1 - Login onto using your credential
In the menu section, you can find "Stake" option
As soon as your node is reviewed & approved, you will be able to see your approved node in this section.
{% hint style="info" %}
For bounty winners, 90% or 50%, the respective token to be staked for the first node. For instance, here this user is not bounty winner so he has to stake 2K PLI node for this address
For 50% bounty winner - They will by default stake 1000 PLI for the first node
For 90% bounty winner - They will by default stake 200 PLI for the first node
Remaining tokens for bounty winner will be staked by Plugin Admin for the first Node.
{% endhint %}

> It is very important to note that, your wallet address (XDC Pay) is the default. Staking will take two key parameters as inputs- Your node address & Wallet address.
Staking required two operations to do
* Sign
* Stake
Once you perform both operations successfully, the respective token will be deducted from your wallet address & staked on your behalf.
After you stake successfully, your node will be displayed in the oracle node platform home page below

{% hint style="info" %}
For Bounty Users, after the user stakes the PLI, PLUGIN Admin will stake the remaining tokens. Only then, the node will be displayed on the home page. - So don't be surprised if your node is not visible immediately after you stake if you are a bounty user.
{% endhint %}
Once you staked, you can see the details in "stake section"

# How to add Job to your node
Step 1 - Login onto using your credentials
Step 2 - Go to the "My Nodes" menu
Step 3 - Click "Manage"
Click "Add New" & fill in the information like below
* Name - Job Name - For instance - "Sleep Task"
* Short Description - Short description to explain what this job does
* Oracle Address - Oracle Smart Contract address
* Job Id - JOB ID received, during job setup in Plugin Node
* Cost - Fee, you want to get from users to use this job
* Job Specification - JSON Specification
For instance -

{% hint style="info" %}
An oracle can connect with multiple jobs.
{% endhint %}
After you submit the job, it will be in a "Pending" state. To view " Go to my Nodes -> Choose the node -> Manage
Plugin Team, will review & approve the job id to display in "Node Operator Platform"
# View the node details
Once your node is approved by Plugin Governance Committe, you will be able to view the node details in landing page like below

It shows, "Nodes & Jobs",
# De-Activate / Re-activate my nodes
For some reason, if you want to deactivate your nodes and re-activate it later. So to avoid reputation hit due to downtime. You can do so, through this approach
For De-activation
Step 1 - Go to "My Nodes" section
Step 2 - Click "De-activate" it will ask you a confirmation to remove from public view
For Re-activation
Step 1 - Go to "My Nodes" section
Step 2 - Click "Re-activate" it will ask you a confirmation to display for public view
{% hint style="info" %}
Note: In this approach, only the node gets deactivate & re-activated. The staked amount will not have any impact
{% endhint %}
# Withdraw staked PLI
Withdrawal of "staked PLI" is not allowed ***within a year of staking***. Only node operators with high reputation can request for un-stake or early release. In other cases of emergency for the Node Operator, the Governance Committee will take a considerate decision on receipt of the request.
* In this case, a strong justification is required to send via EMAIL to ""
* After the review & approval, the node will be unlocked from the "Plugin Governance Committee"
* User can view the "withdraw option" in their staking module like below.

After you click "Withdraw" the staked PLI balance will be received at the respective user's wallet address and the node will be set to "De-active" and removed from the public view.
# Withdraw PLI from Plugin Node
Whenever you set up a plugin node, a dedicated wallet will be generated and it is unique to that plugin node address. It is necessary to sufficiently fund your Plugin node with XDC for the transaction fee & PLI for the oracle fee.
So what if you want to withdraw a portion of this to your wallet?
Step 1) Every plugin node generates the unique wallet and generates the private key in the database.
Step 2) You can find the “private key’” for your wallet in the “Keys” table in Postgres
Step 3) With a sudo user, you can view the json value in the table
Step 4) Copy down the json into a json file(let’s say — Test.json)
Step 5) Import this json into metamask to view your XDC / PLI balance
#### Step 1) Login into Postgres
```
sudo -u postgres -i
```
#### Point to right database
```
/c plugin_mainnet
```
#### Step 2) Apply following Query
```
select json from keys LIMIT 1;
```
#### Step 3) Copy the json values into a test file
```
copy the complete json values into a test file.. say test.json
```
For ex — below data(mock) for your reference..
{“id”: “afa354f-8a9a-4cb2-ba22–8bc19d842b7d”, “crypto”: {“kdf”: “scrypt”, “mac”: “04d3dd0f3f2b44444f9350560bfa828b3658703676636c2751993c983d9b40c6”, “cipher”: “aes-128-ctr”, “kdfparams”: {“n”: 262144, “p”: 1, “r”: 8, “salt”: “6d99ff17d887763d3774aa5bc00631e2a79763be68884af1e4f262cd8cd0828”, “dklen”: 32}, “ciphertext”: “3bfee9e6ed917f1b335e95df5554ebc72c80e63979027e74634f2aebf08f02f1”, “cipherparams”: {“iv”: “eb3bcbabf6d871c829e5948da9a690c0”}}, “address”: “bb4d8683f2924473c579c539436810d5ac28aab3”, “version”: 3}
#### Step 4) Add Xinfin mainnet in Metamask using “Add a network” option

#### Step 5 - Now choose “Import account” and select JSON file as type. (Password should be the same as your Keystore password which you entered while you setup Plugin Node)

{% hint style="info" %}
Note: This step will take some time so please be patient also ensure, your node is running and the Plugin UI is logged in (localhost:6688)
{% endhint %}
You can see the address loaded and it shows the right balance of XDC & PLI

To view the PLI balance, click “Import token”.
Step 6 - Copy-paste the PLI mainnet smart contract address (prefix to be changed from XDC to 0x) and click “Add custom token”


# Withdraw PLI from contract
{% hint style="info" %}
**Please be mindful that, you can withdraw PLI which has been earned by Oracle Contract but you cannot withdraw PLI from the Oracle contract when you manually send it.**
{% endhint %}
As a node operator, you are free to set up how much PLI to receive as a fee for your oracle and those Fees can be withdrawn using the oracle smart contract using the below step.
Step 1 — Go to remix ( )
Step 2 — Point Environment to “Injected Web3”
Step 3 — Open your Oracle smart contract with your oracle address
Step 4 — You can see the “Withdraw” option.
* The recipient can be your wallet where you want the PLI to be transferred or withdrawn
* Amount — Number of PLI’s to be withdrawn

# How to add more stake in Node?
This document explains, how to add more staking on your existing node which is approved and staked the minimum amount of 2000 PLI
{% hint style="info" %}
Currently, a total of 10,000 PLI is the maximum stake one node can have.
{% endhint %}
**Step 1:** Make sure, your node is active and the minimum staking amount is staked which is 2000 PLI
**Step 2:** Go to the "My Nodes" Section, scroll right to your node and you should see the "Additional Stake" option

**Step 3:** Click the "Add Now" button and you will be taken to the below page

Let's see what it has and how to read
* Initial Stake indicates, total PLI that you have staked already for this node
* Top-up Stake indicates, how much you have added as additional stake
* Total Stake indicates - Summation of "Initial Stake + Top-up Stake"
* Stake allowed to Top-up indicates - how much additional PLI you can top-up, here it is 2000
* Enter the Token to Stake - Here you have to feed the number of tokens you want to stake as a top-up.
* This number cannot be greater than "Stake allowed to Top-up".
* This number cannot be in decimal or fractional.
* This number cannot be in -ve.
**Step 4** - Put the number of tokens you want to stake like below and click "Save Changes"

**Step 5** - After you click "Save Changes", you should see an alert box for confirmation like below, type "yes" & confirm

**Step 6** - You will have to "Sign & Confirm" the transaction, and you should be good to go

**Step 7** - After, a successful transaction you should see a page like below

**"Total Stake" should sum up, the top-up value + initial stake --> here it is 4000 and the user cannot add more top-up.**
**Step 8 -** It will also display in the dashboard, here (Staked by user -> 3000)
Note - This user is a Bounty winner(50%), and he had a stake of 1000 initially & now after top-up (2000), it is summed up to 3000 PLI

For 90% Bounty winner, it will be 2200 PLI - after top-up
For Non-Bounty winner, it will be 4000 PLI - after top-up
# How to Migrate my Plugin Node to New Server?
Migrating the Plugin node to a new server is easy if you have followed the latest script from our plugin-deployment folder(Modular Script Method). For other steps, such as docker, or an earlier version of plugin deployment adopted by users, new documentation will be shared.
If you have followed the Modular script method(recommended), then please proceed as follows
* Raise a ticket at and keep the Plugin Team informed, with the reason why the migration is to happen (with proper business justification)
* After you get a "Go-ahead" signal, please proceed with the following steps
* Go to this repository ->
* Read through & follow the below steps

Please note, while doing this backup, your node address and oracle address may not change. You will have the entire credential as same as your previous server. ***So you should be good with it, and you need not stake or re-stake.***
{% hint style="info" %}
During Migration, if you happen to see the changes in your node address (mostly it won't), but if there is any change with your node address. Then you have to request for "Un-stake" and do "Re-stake" again.
{% endhint %}
Follow this article for Un-staking & Re-staking => [Click Here](https://docs.goplugin.co/node-operators/how-to-un-stake-and-re-stake-it-back)
# How to Un-Stake the node.
{% hint style="info" %}
**Unstaking of the node that has completed 1 year of staking but has not opted for "re-stake" follows these steps:**
{% endhint %}
1. Log on to the dashboard and go to the "Stake" menu.
2. After selecting the "View" option, you'll notice a button labeled "Request for Unlock" if your node has been staking continuously for a year without any restaking.
3. Once the governance committee reviews your request, your node will be set to the "Unlock" status.
4. You can then withdraw the staked tokens, and the node will be deactivated.
{% hint style="info" %}
**For members who do not meet the criteria mentioned above, the process remains unchanged**
{% endhint %}
1. Raise a ticket/query with the Plugin Team, including the node's IP Address and stake ID, along with the reason for unstaking.
2. After the team verifies the request, it will be presented to our Governance Committee for approval.
3. Once approved, the node will be "Unlocked," allowing members to withdraw their tokens.
# How a Reputation is calculated?
The HIGH Reputation of a node is very critical to strengthening our Plugin Decentralized Network, hence it is the prime responsibility of every node operator to periodically review their node health by ensuring high-time availability.
Plugin Node Reputation will be calculated based on the following metrics
* 24/7 Node Availability
* Keeping Plugin Node and External Initiator running all the time so as to listen to the events.
* Response time for the oracle service.
* Data Quality (If node operators act as a data feed provider)
* Data Integrity.
To start with, we are measuring 24/7 Node availability by periodically pinging the nodes and it will be once a day. So every node will go through this audit on daily basis and the stats will be captured.
Reputation will be calculated based on the number of days a node is up for a month. So monthly reputation along with cumulative reputation will be shown to the node operators.
If you see "0" in your reputation, either your node is newly approved or your node is down and not responding to our audit job.
If your node is newly approved, you can see your reputation from the very next day only. So no action is required from your end.
If your node is running for a long time and you see "0", we would suggest you should review the server and see if anything is blocking the audit job to review the metrics.
As a node operator, it is very important to keep your server healthy by periodically reviewing it and ensuring high-time availability. The Plugin Team, strongly believes that reputation will help every node operator to stay on top of their node service.
### How do I check my node reputation?
* Go to
* Login using your credentials
* Click "My Nodes"

As mentioned earlier, the REPUTATION shows "0" here due to the fact, that the node is newly approved and reputation will be calculated from the very next day.
{% hint style="info" %}
If you have any questions about your Reputation, feel free to raise a ticket from your registered Email ID via
{% endhint %}
# Node Maintenance Instructions for node operators
#### Plugin node operators should follow the below-mentioned points to keep their nodes active and can reap many benefits in the long run.
1. Keep your nodes 24/7 operational.
2. Make sure you have installed log rotation on your node as per the latest modular node setup script, and clean up the logs(/HOME\_PATH/.pm2/logs/\*.gz, /HOME\_PATH/.plugin/\*.gz) periodically.
3. Node operators who are using Docker (OneClickDeploy) method can clean up the logs in their docker container using the below-mentioned commands.\
i) sudo docker exec -it plinode /bin/bash -c "truncate -s 0 \~/.pm2/pm2.log"
ii) sudo docker exec -it plinode /bin/bash -c "truncate -s 0 \~/.plugin/log.jsonl"
4. Check your node dashboard from time to time by logging in with your credentials, to know about your node reputation.
5. Though your node is 24/7 operational and your node is up and running and your reputation went down, please raise a Ticket with your node’s ‘pm2 status’ screenshot as an attachment.
6. Keep a periodic watch on announcement/update through our channels(like Discord, Twitter, etc.,) to get the latest update.
# PLI Yield Farming
{% hint style="info" %} **Staking on PLI Yield Farming has been temporarily halted from December 31, 2022, until further announcement.**
Since the staking has exceeded the expected numbers.
{% endhint %}
#### The Key features of PLI yield farming are given below
* **Staking requirement:** Minimum 50,000 PLI tokens – Maximum 1 Million PLI tokens.
* **Mandatory Staking Period:** 1 year, once the tokens have been staked, unstaking should not be allowed under any circumstances.
* **Rewards:** 2.5 % per month in PLI tokens (APY 30%) subject to yearly review by the Governance Committee.
* Rewards will be given only if staked PLI is in multiple of 10,000 tokens over and above 50,000 staked tokens.
* **Plugin Yield Farming UI:** A “state of the art” interactive interface for the members.
* A dedicated technical champion providing necessary assistance.
# Steps for Staking in Plugin Yield Farming (PLIYF)
On this page, members can get complete steps on how to do staking in Plugin Yield Farming.\
Plugin Yield Farming requires a minimum of 50,000 PLI in your XDCPay wallet to stake.
NOTE: It is recommended to members who have registered via Google forms to stake their tokens, should log out from the PLIYF portal and re-login with their registered XDCPay wallet address.
#### STEP: 1
Login and open your **XDCPay** wallet Account.
#### STEP: 2
After you log in to the portal, you can see your registered wallet, and your PLI & XDC holdings in your wallet get displayed. Click on the 'Deposit' button provided on the page.

#### STEP:3
Once you click on the 'Deposit' button, you can select the number of PLI to stake and click on the 'Sign Transaction' button.

#### STEP: 4
Please submit the transaction and wait for the page to redirect to your dashboard.

#### STEP: 5
Once your transaction is done, you will be allowed to perform the staking.

#### STEP: 6
Perform the deposit transaction.
**Please be informed that, while performing this transaction does not close or move out of the page.** After the transaction is done successfully the page will be redirected automatically to your dashboard.

#### STEP: 7
At the end you should see the success screen. Happy Staking!!

# PLIYF - FAQ
This Page gives the Freqently Asked Questions and it's clarifications with respect to YieldFarming.
1. **Can I continue Yield farming for one more term?**\
Plugin Yield farming cannot be continued after 365 days, from the date of your each deposit.
2. **When can I withdraw my tokens from "PLI Yield Farming"?**\
At the end of 365 days from the date of deposit, members will be eligible for unstaking and withdrawal.
3. **Can I withdraw all my tokens after an year?**\
Yes, you can withdraw all your tokens which has completed one year of holding period from the date of deposit in Yield farming contract.
4. **What happens when my tokens are unstaked and retained in the contract?**\
Once the tokens are 'Unstaked' it is the responsibility of the member to withdraw the tokens. When the tokens are unstaked and not withdrawn, depositors will not get rewards for holding their tokens in Plugin's contract.
5. **Will I get my PLI back, if I lost my wallet access through which I registered and deposited in Yield Farming?**\
It is the primary responsibility of the member to have access to his/her wallet. If the member lost access to his/her wallet address, then the staked tokens remain in the contract address and nobody can access those tokens.
---
[Next Page](/llms-full.txt/1)


